| “This site contains affiliate links for which OEMDTC may be compensated” |
NHTSA Campaign Number: 17V457
Manufacturer Mazda North American Operations
Components AIR BAGS
Potential Number of Units Affected 79,402
Passenger Frontal Air Bag Inflator May Rupture
An inflator rupture may result in metal fragments striking the vehicle occupants resulting in serious injury or death.
Summary
Mazda North America Operations (Mazda
 ) is recalling certain 2012 CX-7, CX-9 and Mazda6 vehicles sold, or ever registered, in the states of Alabama, California, Florida, Georgia, Hawaii, Louisiana, Mississippi, South Carolina, Texas, Puerto Rico, American Samoa, Guam, the Northern Mariana Islands (Saipan), and the U.S. Virgin Islands, or “Zone A.”
Additionally, unless included in “Zone A” above, Mazda is recalling certain 2009 CX-7, CX-9 and Mazda6 vehicles sold, or ever registered in the states of Arizona, Arkansas, Delaware, District of Columbia, Illinois, Indiana, Kansas, Kentucky, Maryland, Missouri, Nebraska, Nevada, New Jersey, New Mexico, North Carolina, Ohio, Oklahoma, Pennsylvania, Tennessee, Virginia, and West Virginia, or “Zone B.”
Additionally, unless included in “Zone A” or “Zone B” above, Mazda is recalling certain 2007-2008 CX-7 and CX-9 sold, or ever registered in the states of Alaska, Colorado, Connecticut, Idaho, Iowa, Maine, Massachusetts, Michigan, Minnesota, Montana, New Hampshire, New York, North Dakota, Oregon, Rhode Island, South Dakota, Utah, Vermont, Washington, Wisconsin, and Wyoming.
These vehicles are equipped with certain air bag inflators assembled as part of the passenger frontal air bag modules used as original equipment or replacement equipment. In the event of a crash necessitating deployment of the passenger frontal air bag, these inflators may rupture due to propellant degradation occurring after long-term exposure to absolute humidity and temperature cycling.
Remedy
Mazda will notify owners, and dealers will replace the front passenger side air bag inflator with an alternate inflator, free of charge.
The recall is expected to begin August 15, 2017.
Owners may contact Mazda customer service at 1-800-222-5500.
Mazda ’s number for this recall is 1317F.
Note: This recall supersedes recall 17V-012.
Notes
Owners may also contact the National Highway Traffic Safety Administration Vehicle Safety Hotline at 1-888-327-4236 (TTY 1-800-424-9153), or go to www.safercar.gov.
Check if your Mazda has a Recall
July 12, 2017
Attention: Mazda Service and Parts Managers
Subject: Safety Recall 9516E and 0717A – Takata Passenger Air Bag Inflator
Effective July 7, 2017, Recall 9516E and 0717A for the Takata Passenger Air Bag Inflator has transitioned from non-modified (“original”) remedy parts to modified (“permanent”) remedy parts.
Because of this transition, the last day dealers were able to order “original” repair parts EGY1-57-K80 and GSZL-57-K80 was July 7th. Repairs for 9516E and 0717A are permitted to continue until July 14, 2017 with original parts that are available in dealer inventory.
After July 14, 2017, do not perform any 9516E or 0717A recall repairs. Warranty claims for recall 9516E and 0717A repairs performed after July 14, 2017 will be rejected.
If you have a vehicle at your dealership that could not be repaired under 9516E or 0717A by the close of business July 14th, offer the customer an MCVP or rental vehicle.
Recall 1317F replaces recall 9516E and 0717A which is scheduled to launch the week of July 24, 2017.
Permanent remedy parts for 1317F will initially be available for certain vehicles in Zone A states. As parts become available, Recall 1317F will display OPEN in eMDCS for certain VINs in Zone A states. As additional parts become available, owners will be notified in phases.
Original replacement remedy parts EGY1-57-K80 and GSZL-57-K80 should be immediately removed from your parts inventory on July 14th. Installing EGY1-57K80 and GSZL-57-K80 after July 14, 2017 will result in claim denial and may result in fines or other penalties imposed by NHTSA. Recall 1317F will have new replacement part numbers.
Parts collections for EGY1-57-K80 and GSZL-57-K80 instructions are the subject of a separate communication that was sent to dealers on 7/7/2017 titled:
New-Non-Used Takata Passenger Air Bag Inflator stock–EGY1-57-K80 and GSZL-57-K80.
WARRANTY CLAIMS FOR 9516E and 0717A
Recall 9516E and 0717A will continue to display on eMDCS until the week of July 24, 2017. However, recall 9516E and 0717A repairs must not be performed after that date as original parts will be collected immediately. Please submit all outstanding 9516E and 0717A claims by July 14, 2017. Prompt submission of warranty claims will assist in the proper and prompt notification of the customer’s recall status.
Please make certain the appropriate personnel in your dealership are aware of these resources and are familiar with the details of this recall before responding to customer inquiries.
We apologize for any inconvenience this recall may cause you and your customers. Your understanding and support in carrying out this campaign is greatly appreciated.
Because Driving Matters, Safety Matters. Your safety is important to Mazda .
.
Mazda Technical Services
July 26, 2017
Attention: Mazda Service and Parts Managers
Subject: Announcing the launch of Safety Recall 1317F – Takata Frontal Passenger Side Air Bag Inflator, and the closure of Safety Recalls 9516E and 0717A – Takata Passenger Air Bag Inflator.
Recall 1317F has transitioned to modified (“permanent”) remedy parts and supersedes Recalls 9516E and 0717A.
Both Recalls 9516E and 0717A which used non-modified (“original”) remedy Takata Passenger Air Bag inflators are now closed, and will be removed from eMDCS by July 28, 2017.
Affected vehicles include 2007-2012 Mazda CX-7 and CX-9, and 2009-2012 Mazda6 registered or ever registered in a ZONE A state. Additionally, 2007-2009 Mazda
 CX-7 and CX-9, and 2009 Mazda6 registered or ever registered in a ZONE B state, and 2007-2008 Mazda
 CX-7 and CX-9 vehicles remaining in ZONE C states.
Owners of unrepaired vehicles currently in Recalls 9516E and 0717A will display either OPEN or PRELIMINARY STATUS in eMDCS for recall 1317F. Owners will be notified by mail starting July 31, 2017.
All vehicles currently open in Recall 9516E will display OPEN in eMDCS for 1317F. Any vehicle that was in preliminary status for Recall 9516E and all vehicles currently in recall 0717A will remain in preliminary status for Recall 1317F as before. Mazda expects to start opening the repair to additional vehicles displaying preliminary status by Fall, 2017. Until then, contact your District Manager or the Dealer Assistance Group (DAG) for any customer requesting an emergency repair for a vehicle that is displaying preliminary status in eMDCS. Mazda
 has allocated limited stock for emergency customer requests – do not turn customers away that are requesting repairs.
As additional parts become available, owners will be notified in phases.
Recall 1317F will use these new replacement part numbers.
- CX-7 EGZ1-57-K80
- CX-9 TDY1-57-K80
- Mazda6 GSYL-57-K80
Beginning on Friday, July 28, 2017 these parts can be ordered using the Restricted Parts Ordering Weblink, and selecting Recall 1317F from the menu. Please note; all orders will be VIN specific and only VINs in an “OPEN” status will be accepted. You will need to contact the DAG for all other orders.
To help you effectively perform this recall, Mazda has developed the following resources:
- Parts and Warranty Information, Repair Procedure, and Owner Letter will post on MGSS (Mazda
 Global Service Support) website via MXConnect by July 28, 2017. D329 Technicians will NOT be allowed to perform this recall initially but will be looked at in the future.
 - Parts and Warranty information is also available on eMDCS and will post by July 28, 2017.
- For technical assistance, contact the Technical Assistance Hotline (888) 832-8477, Option 3.
- For warranty questions, contact the Warranty Hotline at (877) 727-6626, Option 3.
- For parts questions, contact the Corporate Dealer Assistance Group at (877) 727-6626 Option 2.
- We recommend using the Recall Customer Identification Report #JS30R192-2 available in Web Reports to encourage customers who received the recall notice to come in for the recall. Dealers may use such customer information for the sole purpose of conducting and performing this recall, and for no other purpose. Using it for marketing activities is strictly prohibited and could subject your dealership to serious fines. The information in the report is protected by state privacy and other applicable laws regarding disclosure of personal and/or confidential, restricted or blocked information. It is the dealer’s responsibility to protect the confidentiality of customer records and prevent the release of information to other parties.
Please make certain the appropriate personnel in your dealership are aware of these resources and are familiar with the details of this recall before responding to customer inquiries.
We apologize for any inconvenience this recall may cause you and your customers. Your understanding and support in carrying out this campaign is greatly appreciated.
Because Driving Matters, Safety Matters. Your safety is important to Mazda .
.
Mazda Technical Services
PARTS AND WARRANTY INFORMATION
Recall Campaign 1317F
CONDITION OF CONCERN
In the subject vehicles, continued exposure to high levels of absolute humidity may cause the passenger frontal air bag inflator housing to rupture and deploy abnormally in the event of a crash necessitating deployment of the passenger frontal air bag. An inflator rupture could result in metal fragments striking the front passenger or other vehicle occupants, resulting in serious injury or death.
Dealers are to replace the passenger side frontal air bag inflator of subject vehicles with a permanent remedy one.
MANDATORY AIR BAG INFLATOR RETURN
The original air bag inflator(s) should be returned by your dealership every 30 days or once 200 inflators have been accumulated. All inflator part numbers can be counted and shipped together for these returns. To schedule a return, please contact XPO at (877) 650-3476. Detailed air bag inflator return instructions can be found on MGSS and the Dealer Assistance Group websites. Failure to return the original inflator will result in a Warranty Claim Debit.
Please refer the Repair Procedure document on MGSS for further details.
SUBJECT VEHICLES
Zone A
| Model | VIN Range | Note |
| 2007- 2012 CX-7 | ALL | Originally sold or ever registered in Alabama, California, Florida, Georgia, Hawaii, Louisiana, Mississippi, South Carolina, Texas, Puerto Rico and Guam |
| 2007- 2012 CX-9 | ALL | |
| 2009 – 2012 Mazda6 | ALL |
Zone B
| Model | VIN Range | Note |
| 2007- 2009 CX-7 | ALL | Originally sold or ever registered in Arizona, Arkansas, Delaware, District of Columbia, Illinois, Indiana, Kansas, Kentucky, Maryland, Missouri, Nebraska, Nevada, New Jersey, New Mexico, North Carolina, Ohio, Oklahoma, Pennsylvania, Tennessee, Virginia, West Virginia |
| 2007- 2009 CX-9 | ||
| 2009 Mazda6 |
Zone C
| Model | VIN Range | Note |
| 2007-2008 CX-7 | ALL | Originally sold or ever registered in Alaska, Colorado, Connecticut, Idaho, Iowa, Maine, Massachusetts, Michigan, Minnesota, Montana, New Hampshire, New York, North Dakota, Oregon, Rhode Island, South |
| 2007-2008 CX-9 | ALL | Dakota, Utah, Vermont, Washington, Wisconsin, Wyoming |
OWNER NOTIFICATION
Mazda will notify U.S. owners by first class mail on July 31, 2017.
PARTS INFORMATION
| Description | Part number | Quantity | Applicable Model |
| Passenger Side Front Air Bag Inflator |
EGZ1-57-K80
| 1 | Mazda CX-7 CX-7
|
|
TDY1-57-K80
| 1 | Mazda CX-9 CX-9 | |
| GSYL-57-K80 | 1 | Mazda6 | |
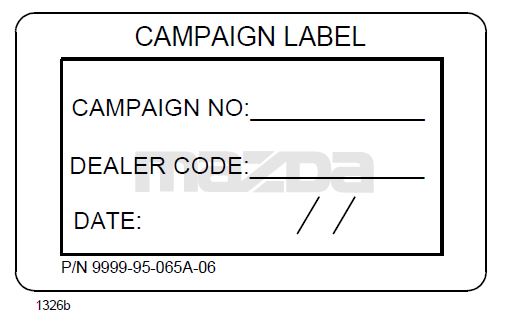
| Campaign Label | 9999-95-065A-
06 | 1=50
labels | Obtain in Mazda e-Store (no charge) e-Store (no charge) |
WARRANTY CLAIM PROCESSING INFORMATION
| Replacement of Passenger Side Front Air Bag Inflator | |||
| CX-7 | CX-9 | Mazda6 | |
| Process Number | AH032A | AH032B | AH032C |
| Symptom Code | 99 | 99 | 99 |
| Damage Code | 99 | 99 | 99 |
| Part Number Main Cause | EGZ1-57-K80 | TDY1-57-K80A | GSYL-57-K80A |
| Quantity | 1 | 1 | 1 |
| Labor Operation Number | XXN7DXRX | XX7NDXRX | XXN7DXRX |
| Labor Hours | 1.1 hrs. | 0.7 hrs. | 0.8 hrs. |
RENTAL CAR INFORMATION
Mazda recommends the usage of the MCVP loaner vehicle when available. If all MCVP loaner vehicles are in use and unavailable, and the customer needs a rental car, then use your local rental facility and offer a rental car. Be sure that every effort is made to repair the car within one business day or less in order to allow the next customer the same experience.
Rental Car Warranty Claim Information
| MCVP Vehicle Preferred | Rental Agency Vehicle | |
| Warranty Type Code | N/A
MCVP does not require claim submission | A |
| Symptom Code | 99 | |
| Damage Code | 99 | |
| Part Number Main Cause | 5555-13-17FR | |
| Part Quantity | 0 | |
| Labor Operation Code | MM024XRX | |
| Labor Hours | 0 | |
| Sublet – Rental Car | ||
| Sublet Invoice Number | Number from Rental Invoice or Dealer Purchase Order | |
| Sublet Type Code | Enter “Z9” (other) | |
| Sublet Amount | Up to $30.00 per day for the number of days customer had rental car | |
| Sublet Text | Number of days rental car was supplied to customer |
Rental expenses exceeding the two-day limit will require prior DSM Authorization, as outlined in the Mazda Rental Car Reimbursement Program policy.
2007-2012 CX-7, 2007-2012 CX-9, 2009-2012 MAZDA6 – PASSENGER AIR BAG SAFETY RECALL 1317F
A. VEHICLE INSPECTION PROCEDURE
- Verify that the vehicle is within the following ranges:
| Model |
| 2007-2012 CX-7 |
| 2007-2012 CX-9 |
| 2009-2012 Mazda6 |
- – If the vehicle is within the above ranges, proceed to Step 2.
- – If the vehicle is not within the above ranges, return vehicle to the customer or inventory.
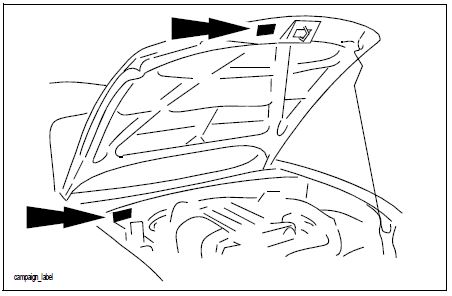
- Perform a Warranty Vehicle Inquiry using your eMDCS System and inspect vehicle for Campaign Labels Recall 1317F attached to the vehicle’s hood or bulkhead. Refer to eMDCS System – Warranty Vehicle Inquiry Results table below.
NOTE: Be sure to verify Recall number as the vehicle may have multiple Recall labels.
eMDCS System – Warranty Vehicle Inquiry Results:
| If eMDCS displays: | Campaign Label is: | Action to perform: |
| RECALL 1317F OPEN | Present | Contact the Warranty Hotline at (877) 727-6626, option 3, to update vehicle history. |
| Not present | Proceed to “B. REPAIR PROCEDURE”. | |
| RECALL 1317F CLOSED | Present | Return vehicle to inventory or customer. |
| Not present | Proceed to “C. CAMPAIGN LABEL INSTALLATION”. | |
| RECALL 1317F is not displayed | Does not apply | Recall does not apply to this vehicle. Return vehicle to inventory or customer. |
B. REPAIR PROCEDURE
CX-7:
Passenger-Side Air Bag Inflator Replacement Procedure:
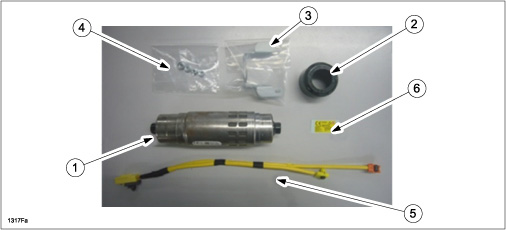
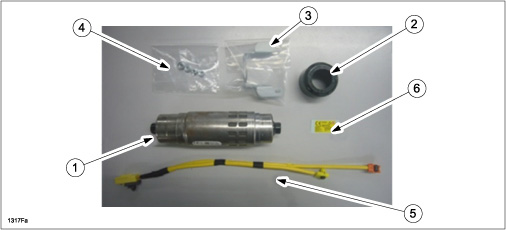
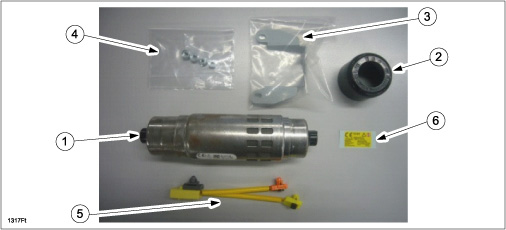
| No. | KIT Component | Quanity |
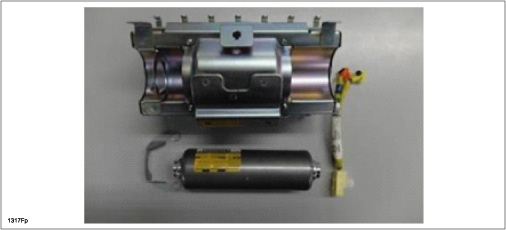
| 1 | Inflator (APPS-7)
EGZ1-57-K80 | 1 |
| 2 | Collar (Black) | 1 |
| 3 | Stopper Plate | 1 |
| 4 | Lock Nut M5 | 4 |
| 5 | Wire Harness | 1 |
| 6 | CE Label | 1 |
NOTE: The wire harness (5) is not genuine. The coupler clip and harness length will be different.
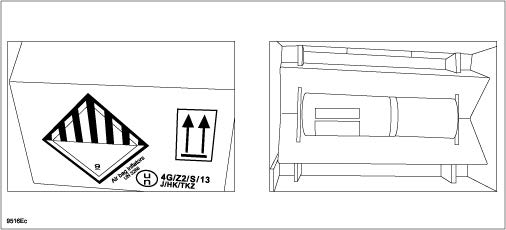
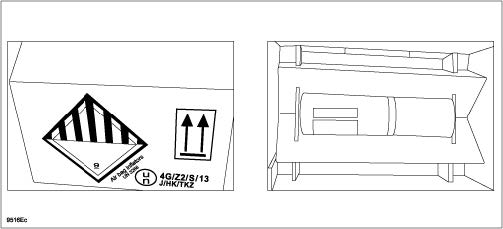
Pack and return the removed inflator as follows:
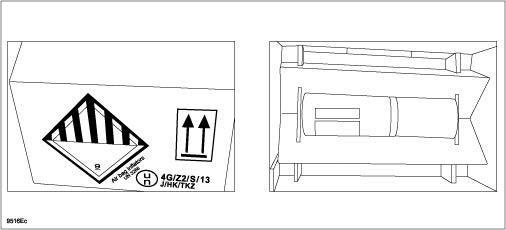
IMPORTANT: Be sure to follow the packing and shipping instructions provided in the carton and in the Air Bag Inflator Return Instructions available on MGSS.
CAUTION:
- Use the same carton which was used to deliver a new inflator. It is a specialized box that is internationally accepted for shipping an inflator.
- Pack the old inflator in the box exactly in the same manner as the new inflator was packed.
Air Bag Module Removal:
WARNING:
- Perform the replacement in a clean environmental. Oil, grease, water, etc. on components may cause the air bag modules to fail to deploy in an accident, which may cause serious injury. Do not allow oil, grease, water, etc., on components.
- Inserting a screwdriver, etc., into the connector of an air bag module may damage the connector and cause the air bag module to deploy improperly, which may cause serious injury. Do not insert any foreign objects into the connector.
- Do not disassemble the vehicle, other than instructed here.
- Do not make an attempt to directly supply electrical power to the module and the inflator.
- Keep the module facing of the pad surface upwards at all times, except during replacement.
- Do not use the module and new inflator if they were dropped on the ground.
- Avoid module and inflator exposure to temperatures of 194 degrees F (90 degrees C) or more.
- Record the customer’s preset radio stations.
- Remove the passenger-side air bag module according to the instructions on MGSS.
(see CX-7 PASSENGER-SIDE AIR BAG MODULE REMOVAL/INSTALLATION)
- Lay a protective cloth on the work bench, then place the air bag module on it to avoid any damage or scratches to the surface.
Inflator Replacement:
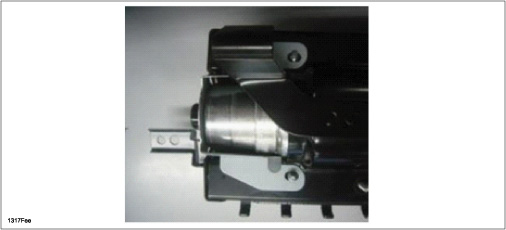
NOTE: To show the air bag module more clearly, the instrument panel trim was removed.
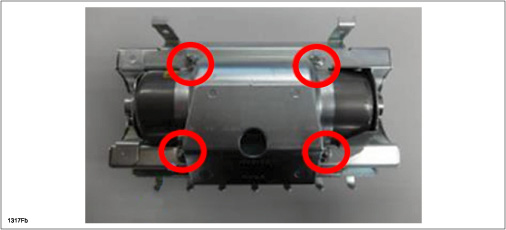
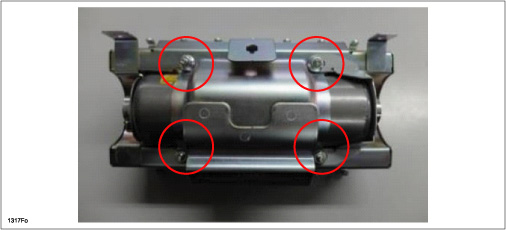
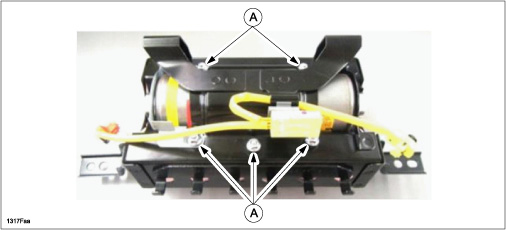
- Remove the M5 nuts from 4 locations.
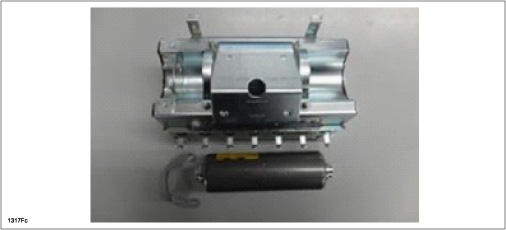
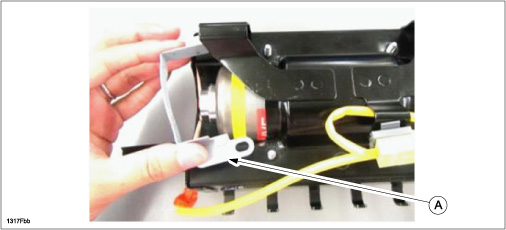
- Remove the stopper plate and inflator.
- Insert the new inflator into the retainer
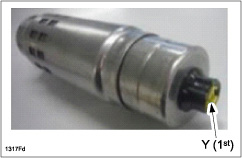
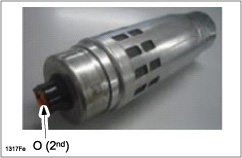
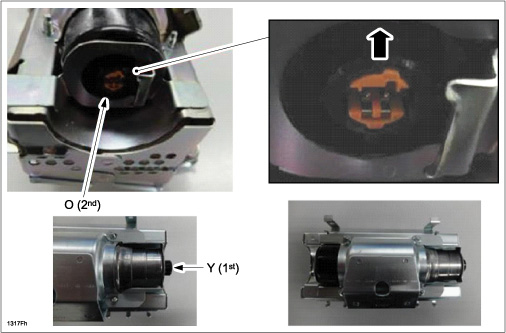
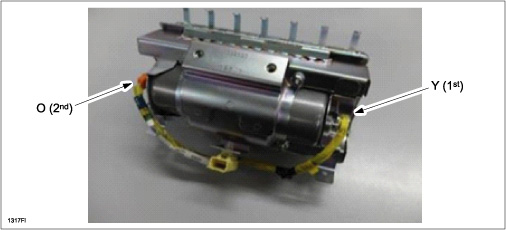
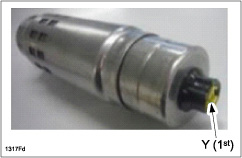
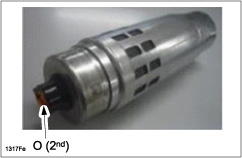
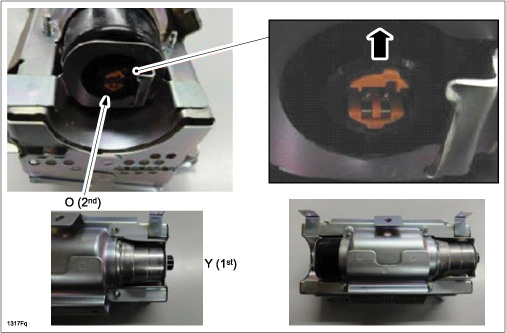
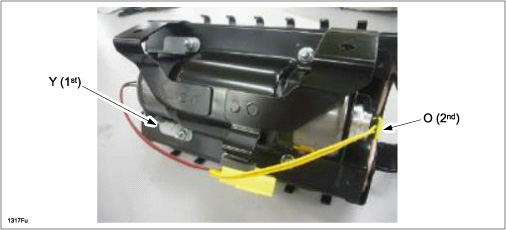
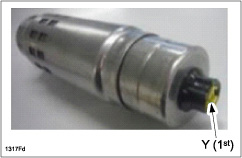
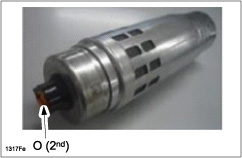
NOTE: Make sure to orientate the 1st and 2nd stage direction before inserting the inflator into the retainer.
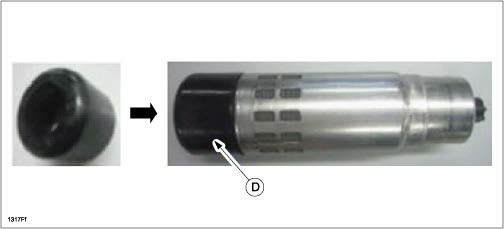
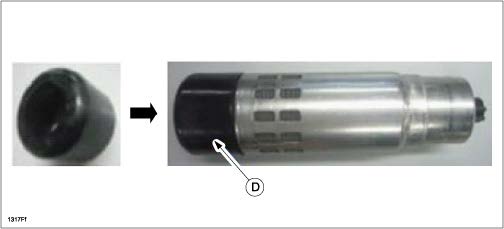
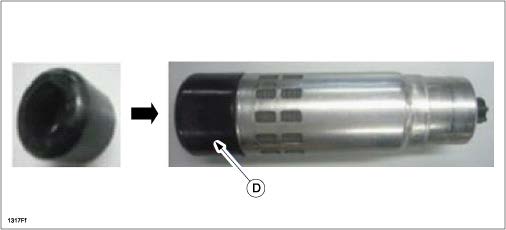
a. Attach the collar D to the 2nd stage side of the new inflator.
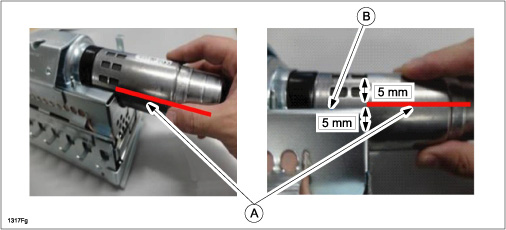
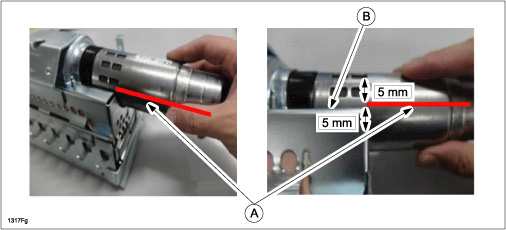
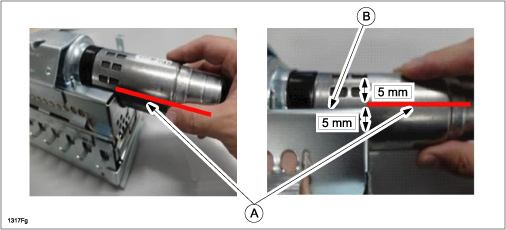
b. Insert the new inflator and align the side of the retainer and guide line of the inflator (A).
NOTE: Align the guide line (red line) within 5 mm from the retainer edge (B).
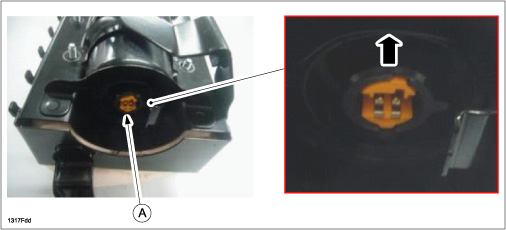
- Confirm that the inflator is assembled correctly.
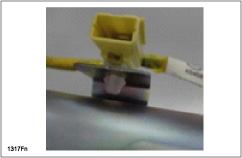
NOTE: Pay attention to the direction of the connector. The connector direction is perpendicular to the bottom of the retainer.
- Install the new stopper to the retainer.
- Install the new M5 nuts in 4 locations.
Tightening torque: 34.5 ± 2.6 in-lb (3.9 ± 0.4 Nm)
Short-cord Replacement:
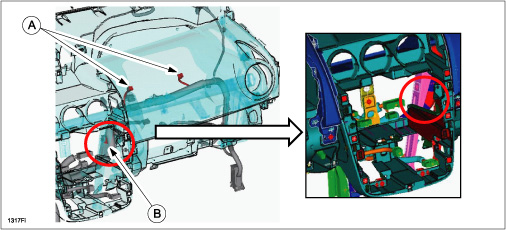
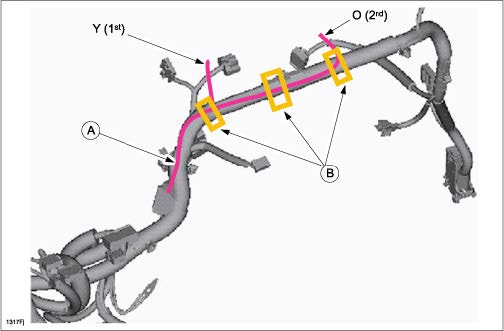
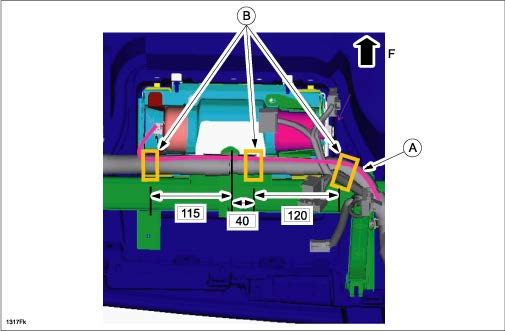
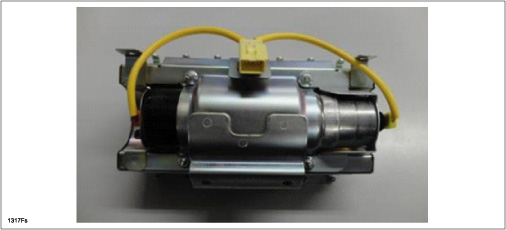
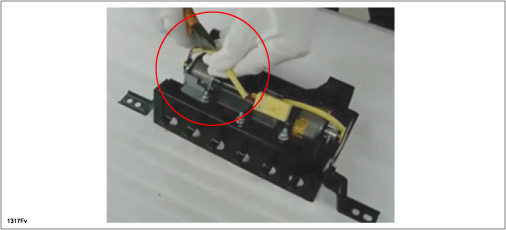
- Remove the SHORT-CORD-A/B as shown.
- Install the new wire harness contained in the KIT (A) and fix the wire harness with a tie wraps (shop supply) at each point shown (B).
View from the underside.
Air Bag Module Reinstallation:
- Install the passenger-side air bag module according to the instructions on MGSS.
(see CX-7 PASSENGER-SIDE AIR BAG MODULE REMOVAL/INSTALLATION)
- Reconnect the negative battery cable.
- Turn the ignition switch to the ON position.
- Verify that the air bag system warning light illuminates for approx. 6 sec., then goes out.
NOTE: If the air bag system warning light does not operate in the manner described above, there is a malfunction in the system. Inspect the system following the on-board diagnostic system procedure on MGSS (Restraints section).
- Re-enter the customer’s preset radio stations.
- Proceed to “C. CAMPAIGN LABEL INSTALLATION”.
CX-9:
Passenger-Side Air Bag Inflator Replacement Procedure:
| No. | KIT Component | Quanity |
| 1 | Inflator (APPS-7)
TDY1-57-K80 | 1 |
| 2 | Collar (Black) | 1 |
| 3 | Stopper Plate | 1 |
| 4 | Lock Nut M5 | 4 |
| 5 | Wire Harness | 1 |
| 6 | CE Label | 1 |
NOTE: The wire harness (5) is not genuine. The coupler clip and harness length will be different.
Pack and return the removed inflator as follows:
IMPORTANT: Be sure to follow the packing and shipping instructions provided in the carton and in the Air Bag Inflator Return Instructions available on MGSS.
CAUTION:
- Use the same carton which was used to deliver a new inflator. It is a specialized box that is internationally accepted for shipping an inflator.
- Pack the old inflator in the box exactly in the same manner as the new inflator was packed.
Air Bag Module Removal:
WARNING:
- Perform the replacement in a clean environmental. Oil, grease, water, etc. on components may cause the air bag modules to fail to deploy in an accident, which may cause serious injury. Do not allow oil, grease, water, etc., on components.
- Inserting a screwdriver, etc., into the connector of an air bag module may damage the connector and cause the air bag module to deploy improperly, which may cause serious injury. Do not insert any foreign objects into the connector.
- Do not disassemble the vehicle, other than instructed here.
- Do not make an attempt to directly supply electrical power to the module and the inflator.
- Keep the module facing of the pad surface upwards at all times, except during replacement.
- Do not use the module and new inflator if they were dropped on the ground.
- Avoid module and inflator exposure to temperatures of 194 degrees F (90 degrees C) or more.
- Record the customer’s preset radio stations.
- Remove the passenger-side air bag module according to the instructions on MGSS.
(see CX-9 PASSENGER-SIDE AIR BAG MODULE REMOVAL/INSTALLATION)
- Lay a protective cloth on the work bench, then place the air bag module on it to avoid any damage or scratches to the surface.
Inflator Replacement:
NOTE: To show the air bag module more clearly, the instrument panel trim was removed.
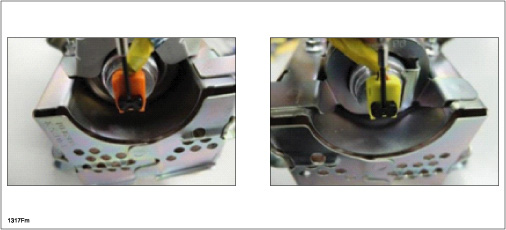
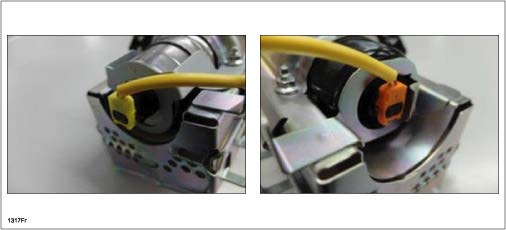
- Remove the connector of the harness assembly.
a. Pull the locking pin up using a thin tool at the tip.
b. Remove the clip from the coupler.
- Remove the M5 nuts from 4 locations.
- Remove the stopper plate and inflator.
- Insert the new inflator into the retainer
NOTE: Make sure to orientate the 1st and 2nd stage direction before inserting it into the retainer.
a. Attach the collar D to the 2nd stage side of the new inflator.
b. Insert the new inflator and align the side of the retainer and guide line of the inflator (A).
NOTE: Align the guide line (red line) within 5mm from the retainer edge (B).
- Confirm that the inflator is assembled correctly.
NOTE: Pay attention to the direction of the connector. The connector direction is perpendicular to the bottom of the retainer.
- Install the new stopper to the retainer.
- Install the new M5 nuts in 4 locations.
Tightening torque: 34.5 ± 2.6 in-lb (3.9 ± 0.4 Nm)
a. Make sure the connectors are fitted properly.
b. The connectors direction is perpendicular to the bottom of the retainer.
Air Bag Module Reinstallation:
- Install the passenger-side air bag module according to the instructions on MGSS.
(see CX-9 PASSENGER-SIDE AIR BAG MODULE REMOVAL/INSTALLATION)
- Reconnect the negative battery cable.
- Turn the ignition switch to the ON position.
- Verify that the air bag system warning light illuminates for approx. 6 sec., then goes out.
NOTE: If the air bag system warning light does not operate in the manner described above, there is a malfunction in the system. Inspect the system following the on-board diagnostic system procedure on MGSS (Restraints section).
- Re-enter the customer’s preset radio stations.
- Proceed to “C. CAMPAIGN LABEL INSTALLATION”.
Mazda6:
Passenger-Side Air Bag Inflator Replacement Procedure:
| No. | KIT Component | Quanity |
| 1 | Inflator (APPS-7)
GSYL-57-K80 | 1 |
| 2 | Collar (Black) | 1 |
| 3 | Stopper Plate | 1 |
| 4 | Lock Nut M5 | 4 |
| 5 | Wire Harness | 1 |
| 6 | CE Label | 1 |
NOTE: The wire harness (5) is not genuine. The coupler clip and harness length will be different.
Pack and return the removed inflator as follows:
IMPORTANT: Be sure to follow the packing and shipping instructions provided in the carton and in the Air Bag Inflator Return Instructions available on MGSS.
CAUTION:
- Use the same carton which was used to deliver a new inflator. It is a specialized box that is internationally accepted for shipping an inflator.
- Pack the old inflator in the box exactly in the same manner as the new inflator was packed.
Air Bag Module Removal:
WARNING:
- Perform the replacement in a clean environmental. Oil, grease, water, etc. on components may cause the air bag modules to fail to deploy in an accident, which may cause serious injury. Do not allow oil, grease, water, etc., on components.
- Inserting a screwdriver, etc., into the connector of an air bag module may damage the connector and cause the air bag module to deploy improperly, which may cause serious injury. Do not insert any foreign objects into the connector.
- Do not disassemble the vehicle, other than instructed here.
- Do not make an attempt to directly supply electrical power to the module and the inflator.
- Keep the module facing of the pad surface upwards at all times, except during replacement.
- Do not use the module and new inflator if they were dropped on the ground.
- Avoid module and inflator exposure to temperatures of 194 degrees F (90 degrees C) or more.
- Record the customer’s preset radio stations.
- Remove the passenger-side air bag module according to the instructions on MGSS.
(see Mazda6 PASSENGER-SIDE AIR BAG MODULE REMOVAL/INSTALLATION) Inflator Replacement:
NOTE: To show the air bag module more clearly, the instrument panel trim was removed.
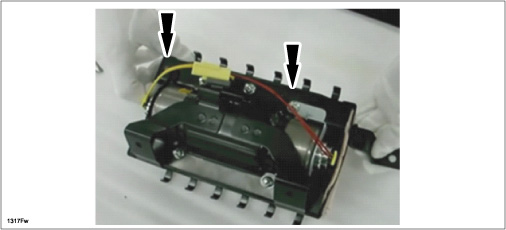
- To prevent the inflator from exploding by mistake during its removal, short-circuit the harnesses.
NOTE: The harness will not be reused after shorting it.
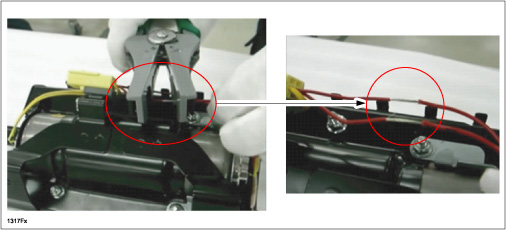
a. Cut off the PVC tube to expose the wires.
NOTE: Cut off the corrugated tubing for the two wire harnesses indicated by the arrows.
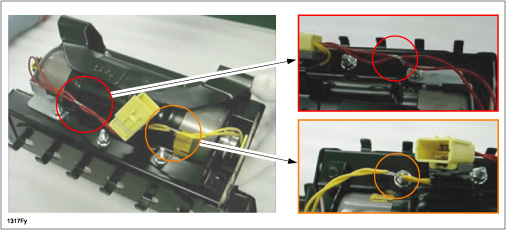
b. Strip the insulation from the two wires as shown.
c. Connect the two wires by twisting them together (for both wire harnesses).
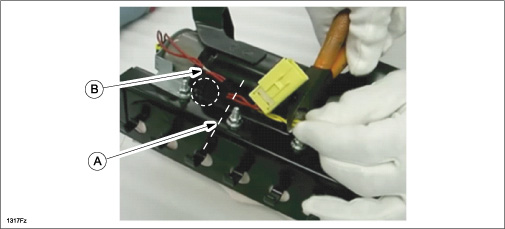
d. Cut the two wires midway (A) between the connector and the splice (B) as shown.
CAUTION: Make sure to cut the wires on either side of the connector between the connector and the splice.
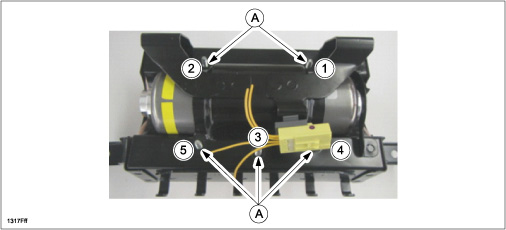
- Remove the five (5) nuts (A).
NOTE: DO NOT excessively depress as the module body may detach from the air bag module.
- Remove the stopper plate (A).
NOTE: Discard four (4) of the nuts and the stopper plate. Keep one of the nuts.
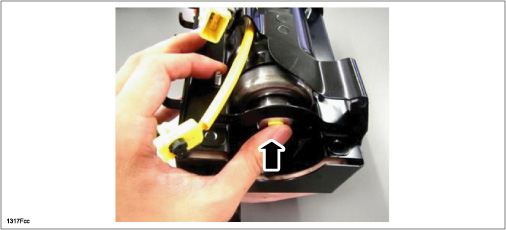
- Push the inflator end with fingers, then remove it by sliding it in the direction shown.
- Insert the new inflator into the retainer
NOTE: Make sure to orientate the 1st and 2nd stage direction before inserting it into the retainer.
a. Attach the collar D to the 2nd stage side of the new inflator.
b. Insert the new inflator and align the side of the retainer and guide line of the inflator (A).
NOTE: Align the guide line (red line) within 5mm from the retainer edge (B).
- Confirm that the inflator is assembled correctly.
NOTE: Pay attention to the direction of the connector. The connector direction is perpendicular to the bottom of the retainer.
- Install the new stopper to the retainer.
- Install the new M5 nuts and one used nut (in position 3) as shown, then tighten the 5 nuts to the specified torque in the order shown.
Tightening torque: 34.5 ± 2.6 in-lb (3.9 ± 0.4 Nm)
CAUTION: DO NOT over tighten the nuts or the stud bolts could be removed from their press-fit points.
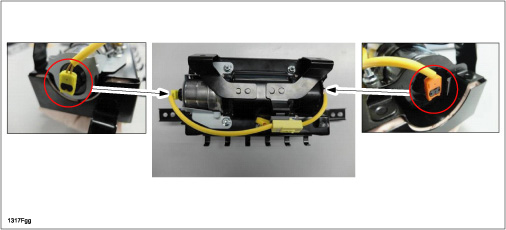
- Connect the replacement wire harness at 2 locations.
NOTE: Make sure the connectors are fitted properly.
Air Bag Module Reinstallation:
- Install the passenger-side air bag module according to the instructions on MGSS.
(see Mazda6 PASSENGER-SIDE AIR BAG MODULE REMOVAL/INSTALLATION)
- Reconnect the negative battery cable.
- Turn the ignition switch to the ON position.
- Verify that the air bag system warning light illuminates for approx. 6 sec., then goes out.
NOTE: If the air bag system warning light does not operate in the manner described above, there is a malfunction in the system. Inspect the system following the on-board diagnostic system procedure on MGSS (Restraints section).
- Re-enter the customer’s preset radio stations.
- Proceed to “C. CAMPAIGN LABEL INSTALLATION”.
C. CAMPAIGN LABEL INSTALLATION
- Fill out a blue “Campaign Label” (9999-95-065A-06) with Campaign No: “1317F”, your dealer code, today’s date.
- Affix it to the hood or bulkhead as shown:
- Return the vehicle to customer.
 Loading...
 Loading...
 Loading...
 Loading...
