| “This site contains affiliate links for which OEMDTC may be compensated” |
2013-2015 CX-5 – DRIVER-SIDE POWER DOOR MIRROR VIBRATION
APPLICABLE MODEL(S)/VINS
2013-2015 CX-5 vehicles with VINs lower than JM3KE******465579 (produced before April 1, 2014)
Vibration from the driver-side power door mirror glass when the vehicle is driven at high speeds.
This concern may be due to a lack of rigidity of the mirror base so the mirror vibrates when it receives vehicle vibration or wind pressure.
An additional reinforcement has been installed inside the door to increase the door panel strength where the door mirror is mounted. Also, the door mirror shape has been changed. Both of these modifications have been implemented to eliminate mirror glass vibration concerns.
REPAIR PROCEDURE
- Depending on the VIN of the customer’s vehicle, use the chart below to determine the applicable repair(s).
| VIN / Prod. Date Range | Applicable Repair | |
| Repair A: Installation of outer door mirror reinforcement(driver’s door only) | Repair B: Replacement of both outer door mirrors | |
| JM3KE******000001 – 168884
Produced on or before Nov. 16, 2012 | Yes | Yes |
| JM3KE******168885 – 465578
Produced between Nov. 16, 2012 and April 1, 2014 | No | Yes |
| Repair A | Repair B |
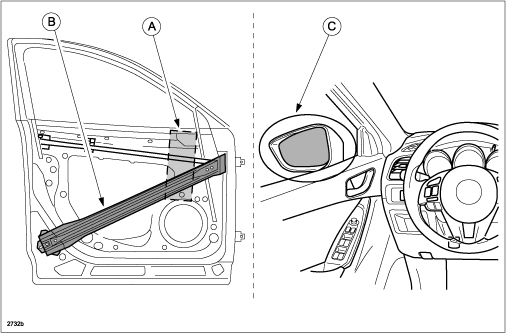
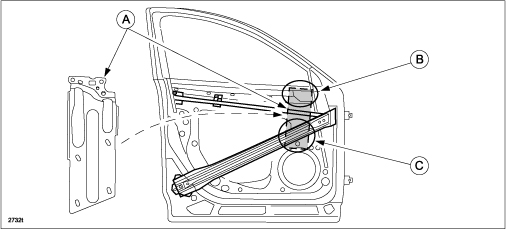
| Install a new upper reinforcement (A) onto the side impact bar-lower (B) in the driver’s side door to increase the rigidity of the door panel where the power door mirror is located. | Replace both side door mirrors (C) with modified (mass-production) parts according to MS3 online or the Workshop Manual.
NOTE: Since the shape of the modified (mass-production) mirror is different than the previous mirror, it is necessary to replace both side mirrors so they match. |
 | |
REPAIR A:
- Remove the driver’s side power door mirror according to the instructions on MS3 online or the Workshop Manual (section 09-12).
- Remove the driver’s side door panel according to the instructions on MS3 online or the Workshop Manual (section 09-11).
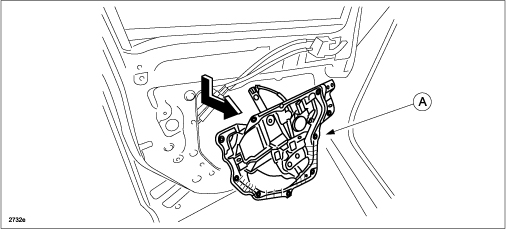
- Remove the front door module panel (A) according to the instructions on MS3 online or the Workshop Manual (section 09-11).
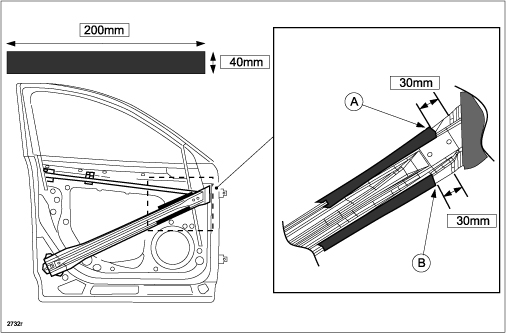
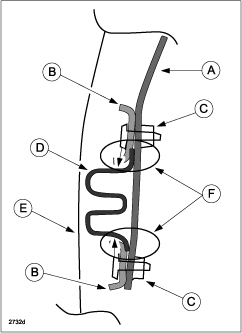
- For rust prevention, attach two (2) self-stick pads (200mm x 40mm) to each edge of the side impact bar-lower (as shown below) where the bracket and reinforcement are installed.
NOTE: Attach the pads starting from the position indicated below at locations (A) and (B).
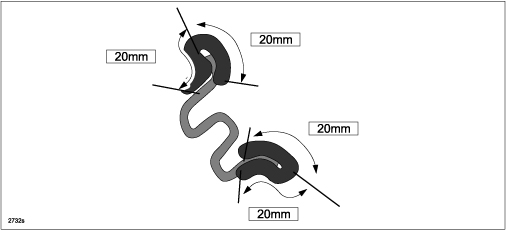
<cross-section>
- Install the reinforcement (A) as shown below. Secure the upper part (B) together with the power door mirror and the lower part (C) to the side impact bar-lower with the two (2) brackets.
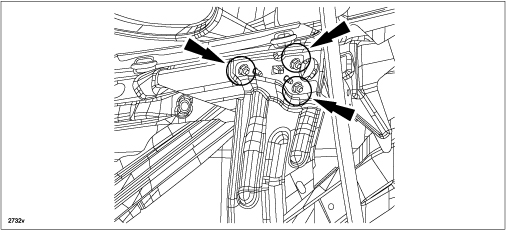
- While holding the power door mirror, temporarily place the reinforcement with the three (3) power door mirror bolts through the holes in the reinforcement, then tighten the bolts.
Tightening Torque: 11 ft. lbf. {1.5 kgf-m, 15 Nm}
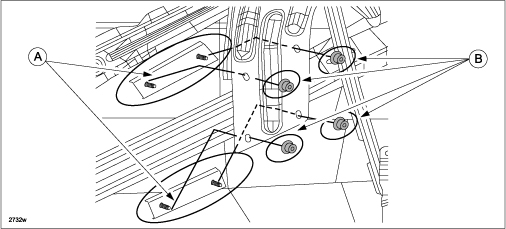
- Place the two (2) brackets (A) (upper and lower) in the back of the reinforcement and pass the stud bolts through the holes in the reinforcement.
NOTE: Pinch the flange of the side impact bar-lower with the bracket and the reinforcement.
- Tighten the four (4) nuts (B) to secure the reinforcement onto the side impact bar-lower.
Tightening Torque: 15 ft. lbf. {2.1 kgf-m, 20 Nm}
NOTE:
- Tighten the brackets so that the side impact bar-lower is pushed toward the direction of the arrow.
- Ensure that each part does not touch petal to petal face or it will cause rust occurrence.
- Install other removed parts in the reverse order of removal.
REPAIR B:
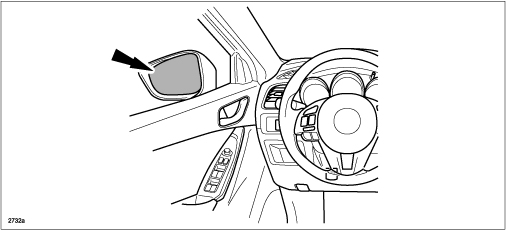
- Remove both power door mirrors (A) according to the instructions on MS3 online or the Workshop Manual (section 09-12).
- Install a new garnish (mirror housing) (A) onto both new door mirrors according to the instructions on MS3 online or the Workshop Manual (section 09-12).
- Install new door mirrors according to the instructions on MS3 online or the Workshop Manual.
PART(S) INFORMATION
| New Part Number | Original Part Number | Description | Qty. | Notes |
| KAY3-69-120 | KD35-69-121 | Power outer mirror | 1 | Passenger side |
| KAY3-69-180 | KD35-69-181 | 1 | Driver’s side | |
| KAY4-69-120 | KD37-69-121 | 1 | Passenger side (Canada Only) | |
| KAY4-69-180 | KD37-69-181 | 1 | Driver’s side (Canada Only) | |
| KAY5-69-120 | KD33-69-121 | 1 | Passenger side | |
| KAY5-69-180 | KD33-69-181 | 1 | Driver’s side | |
| KAY6-69-120 | KE40-69-121 | 1 | Passenger side | |
| KAY6-69-180 | KE40-69-181 | 1 | Driver’s side | |
| KR22-69-1N1 -13 | — | Garnish (R) (mirror housing) | 1 | Deep Crystal Blue |
| KR22-69-1N1 -27 | — | 1 | Meteor Gray | |
| KR22-69-1N1 -33 | — | 1 | Arctic White | |
| KR22-69-1N1 -51 | — | 1 | Jet Black | |
| KR22-69-1N1 -62 | — | 1 | Soul Red | |
| KR22-69-1N1 -83 | — | 1 | Blue Reflex | |
| KR22-69-1N1 -85 | — | 1 | Crystal White Pearl | |
| KR22-69-1N7 -13 | — | Garnish (L) (mirror housing) | 1 | Deep Crystal Blue |
| KR22-69-1N7 -27 | — | 1 | Meteor Gray | |
| KR22-69-1N7 -33 | — | 1 | Arctic White | |
| KR22-69-1N7 -51 | — | 1 | Jet Black | |
| KR22-69-1N7 -62 | — | 1 | Soul Red | |
| KR22-69-1N7 -83 | — | 1 | Blue Reflex | |
| KR22-69-1N7 -85 | — | 1 | Crystal White Pearl | |
| KAY0-69-1N1 | — | Garnish (R) (mirror housing) | 1 | Un-painted |
| KAY0-69-1N7 | — | Garnish (L) (mirror housing) | 1 | Un-painted |
| Part Number | Description | Qty. | Notes |
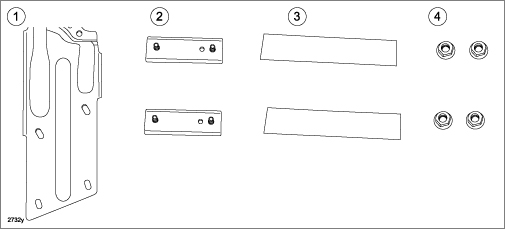
| KDY0-59-050 | Reinforcement Assy. | 1 | 1. Reinforcement (1)
2. Brackets (2) 3. Pads (2) 4. Nuts (4) |
Reinforcement Assembly
 Door Mirror Component with Mirror Housing (A) 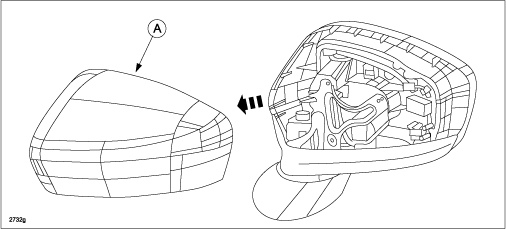 | |||


Oemdtc is TSB acronym for Technical service bulletin ? That implies that it is NOT a recall? Please confirm.
Yes
Is this a recall because my Mazda dealer said that this is not a recall and he would not fix it .
This is a TSB.