| “This site contains affiliate links for which OEMDTC may be compensated” |
| Subject:
MULTI-MODEL – KNOCKING / SQUEAKING NOISE FROM FRONT SHOCK ABSORBER, CREAKING NOISE FROM FRONT LOWER ARM BUSHING | Bulletin No: 02-010/16 |
| Last Issued: 07/21/2016 |
BULLETIN NOTE
This bulletin supersedes the previously issued bulletin(s) listed below: The changes are noted in Red beside the change bars.
| Previously issued TSBs: | Date issued: |
| 02-010/16 | 04/05/2016, 03/10/2016 |
| 02-006/16 | 02/23/2016 |
| 02-003/15 | 12/17/2015 and 02/04/2015 |
| 02-001/15 | 11/20/2015 and 01/14/2015 |
| 02-005/14 | 12/12/2014 |
| 02-005/13 | 08/24/2013 and 11/11/2013 |
APPLICABLE MODEL(S)/VINS
2016 CX-3 vehicles with VINs lower than JM1 DK ****** 136727 (produced before March 07, 2016)
2013-2016 CX-5 vehicles with VINs lower than JM3 KE ****** 742261 (produced before November 16, 2015)
2014-2016 Mazda6 vehicles with VINs lower than JM1 GJ ****** 459655 (produced before November 16, 2015)
DESCRIPTION
Some vehicles may exhibit a knocking / squeaking noise from the front shock absorber when driving on rough roads and/or when turning the steering wheel while the vehicle is stopped.
The noise may be due to:
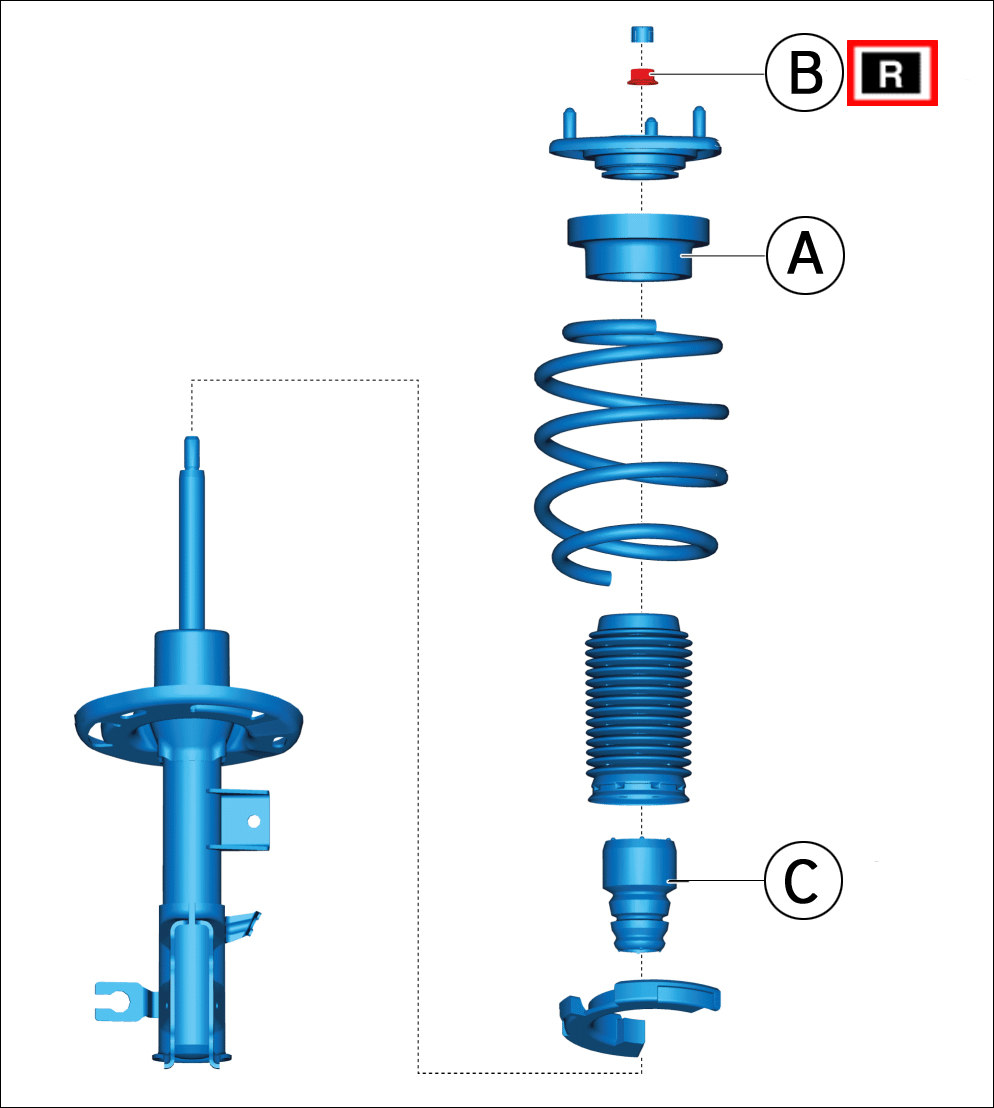
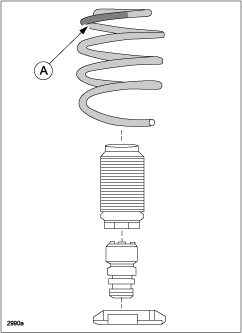
- upper front strut bearing (A) damage. (CX-5 and Mazda6)
- stick/slip between the front strut bearing and coil spring. (CX-3, CX-5 and Mazda6)
- the bump stopper (C) may be contacting the strut bearing when the front shock absorber is compressed, causing a popping noise. (Mazda6 only)
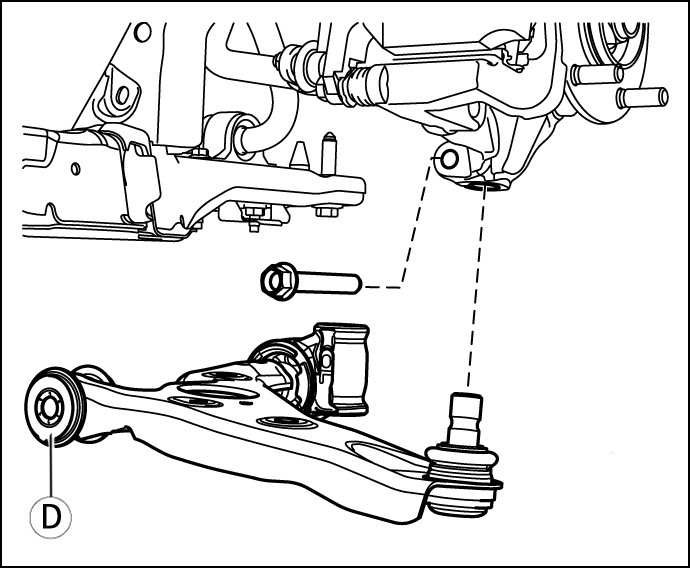
- The front lower arm bushing (D) is making a stick-slip noise in wet road conditions. (CX-5 and Mazda6)
To eliminate the noise, the following mass-production changes have been made:
- The material and production method of the front strut bearing (A) has been changed. (CX-5 and Mazda6)
- A protector has been installed onto the coil spring. (CX-5 and Mazda6)
- The shape of the bump stopper (C) will be modified in the future. (Mazda6 only)
- The shape of the coil spring has been changed. (CX-3 only)
- Friction of the lower arm bushing has been reduced by adding a dry coating. (CX-5 and Mazda6)
NOTE: The piston rod nut (B) requires replacement.
Customers having this concern should have their vehicle repaired using the following repair procedure.
REPAIR OUTLINE
- Use Special Service Tool (SST) ChassisEAR / EngineEAR II Combo JSP06608 or Wireless ChassisEAR JSP97202 to confirm noise is coming from the front suspension when driving over bumps and/or turning the steering wheel while the vehicle is stopped:
NOTE: SST JSP06608 and JSP97202 are available for purchase on Mazda E-Store.
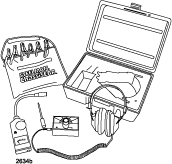 | or |
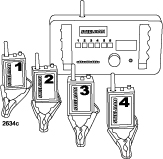 |
| ChassisEAR / EngineEAR II Combo JSP06608 | Wireless ChassisEAR JSP97202 |
- Was the noise verified?
- Yes – Use the table below to determine if the subject vehicle is a Type A, Type B, Type C, Type D, or Type E vehicle.
- No – This does not apply.
| Model | Type A | Type B | Type C | Type D | Type E |
| Mazda6 JM1GJ****** | 100001- 121430 | 121431- 404928 | 404930- 459654 | 459655- 999999 | — |
| CX-5 JM3KE****** | 100001 – 343673 | 343674 – 615843 | 615844 – 742260 | — | — |
| CX-3 JM1DK****** | — | — | — | — | 100001- 199998 |
- Use the table below to identify the appropriate repair.
| Repair
(Perform On Both Sides) | Type A | Type B | Type C | Type D | Type E |
|
1. Inspect the front strut bearing for damage. If damaged, replace it. | Perform | Do Not Perform | Do Not Perform | Do Not Perform | Do Not Perform |
| 2. Install the protector onto the coil spring. (Refer to “Protector Installation Procedure”. | Perform | Perform | Do Not Perform | Do Not Perform | Perform |
| 3. Replace the lower arm bushing. | Perform | Perform | Perform | Do Not Perform | Do Not Perform |
|
4. Replace the bump stopper. (Mazda6 Only) | Perform | Perform | Perform | Perform | Do Not Perform |
NOTE:
- For removal/installation and disassembly/assembly of the front shock absorber, refer to the workshop manual “FRONT SHOCK ABSORBER AND COIL SPRING DISASSEMBLY/ASSEMBLY”.
- Before removing the mounting rubber, put the position mark so the mounting rubber can be installed back in the original position.
CAUTION: It is not necessary to adjust the front wheel alignment because the front shock absorber and the mounting rubber are not replaced. However, make sure to install the mounting rubber to the original position.
REPAIR PROCEDURE
Inspect Front Strut Bearing for damage (For Vehicle Type A only)
- Remove the front strut bearing and coil spring according to the MS3 online instructions or the Workshop Manual (section 02-13 FRONT SHOCK ABSORBER AND COIL SPRING DISASSEMBLY/ASSEMBLY).
- Replace the front strut bearing if damaged*.
Install Protector onto Coil Spring (For Vehicle Type A, B and E)
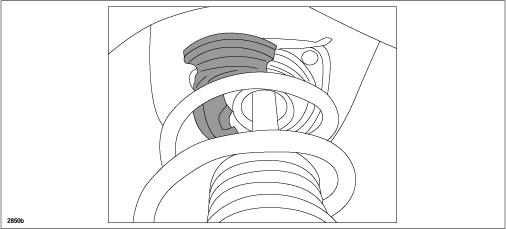
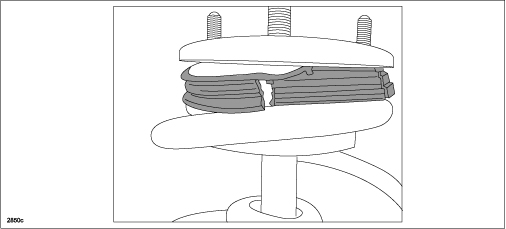
Coil Spring Protector (A) Installation:
- Starting from the top of the coil spring, degrease the spring 1.5 coils downward.
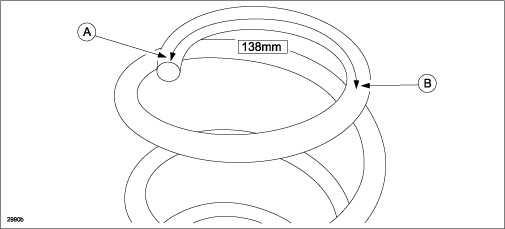
- Cut a thin strip of paper to 138 mm in length (or use a cloth type measuring tape).
NOTE: For CX-3, use 130 mm in length.
- Place the strip of paper (or cloth measuring tape) along the inner side of the coil spring starting at point (A).
- Mark the spot on the spring where (B) is. (B) is the starting point for the protector installation.
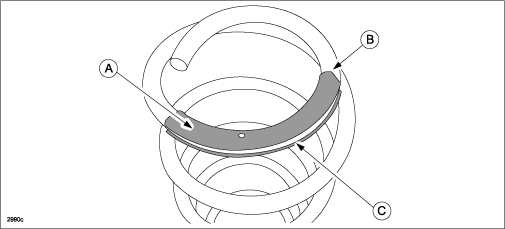
- Install the protector (A) onto the coil spring aligning the end (slant cut side) with the marking at spot (B).
NOTE: Install the protector so the gap (C) is evenly aligned around the outer edge of the coil spring.
- The inner side of the protector contains adhesive glue. After installing the protector onto the spring, press the inner side to firmly adhere it to the spring.
- Assemble the coil spring to the strut assembly and make sure the protector is seated onto the bearing even when the shock absorber is fully extended.
Replace Bump Stopper (For all Mazda6 vehicles)
- Remove the front strut bearing and coil spring according to MS3 online instructions or the Workshop Manual (section 02-13 FRONT SHOCK ABSORBER AND COIL SPRING DISASSEMBLY/ASSEMBLY).
- Replace the bump stopper (C).
- Reinstall the front strut bearing and coil spring according to MS3 online instructions or the Workshop Manual (section 02-13 FRONT SHOCK ABSORBER AND COIL SPRING DISASSEMBLY/ASSEMBLY).
- Repeat Steps 1 – 3 on the opposite side front suspension.
- Verify repair.
Replace Lower Arm Bushing (For Vehicle Type A, B and C)
- Remove the front lower arm (both sides) according to MS3 online instructions or the Workshop Manual (section 02-13 FRONT LOWER ARM REMOVAL/INSTALLATION).
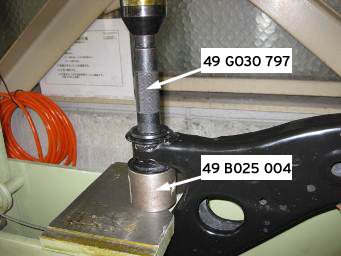
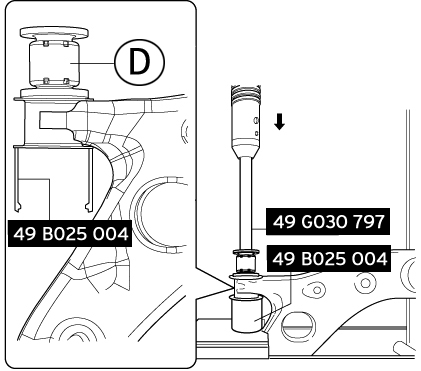
- Remove the front lower arm bushing using the SSTs or bushing adapters.
Set SSTs (49 G030 797 and 49 B025 004) and the front lower arm on a shop press as shown in the figure and remove the front lower arm bushing.
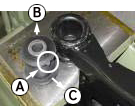
- Install the front lower arm bushing (D) using SSTs.
Install the front lower arm bushing so that the projection (A) shown in the figure is pointing toward the front (B) and out of the vehicle (C).
NOTE:
- Before installing the new bushing, wipe the inside of the outer tube and make sure it is clean.
- Apply soap suds to the front lower arm bushing to facilitate installation.
- If soap suds gets in the inner pipe of the front lower arm bushing, always wipe it off using a cloth.
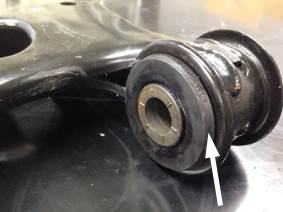
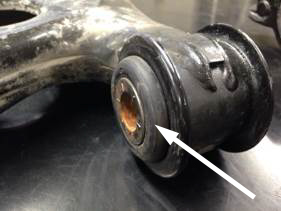
CAUTION: Make sure that the bushing has been properly inserted by checking that the tab of the bushing is completely expanded as shown in the OK illustration.
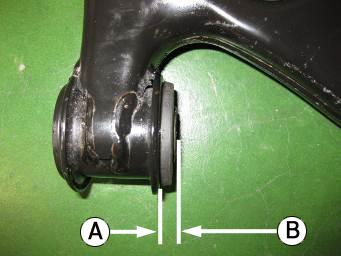
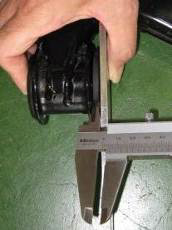
- After the installation, verify that the front lower arm bushing has been installed to the correct position by the procedure shown in the figure.
Specification: Width: 5.8 +/- 0.8mm (0.22 +/- 0.03 in)
| Measure the distance of the lower arm end face (A) and the inner pipe bushing (B). | Measure the width as shown | |
 |  |  |
- Install the front lower arm (both sides) according to MS3 online instructions or the Workshop Manual (section 02-13).
NOTE: For the joint sections with rubber bushings, raise the vehicle using a lift, and then temporarily tighten the installation bolts and nuts. Lower the vehicle to the ground and tighten them to the specified tightening torque.
- Inspect the wheel alignment and adjust if necessary.
- Verify repair.
PART(S) INFORMATION
| Description | Qty. | Notes | Part Number |
| Front Strut Bearing | 1 or 2 | Type A only | KR27-34-38X |
| Piston Rod Nut | 2 | All
Non-reuseable nut R | 9YB0-41-237 |
| Protector | 2 | Type A , B and E | KDY5-34-081 |
| Bump Stopper | 2 | Mazda6 only | GHY9-34-111 |
| F. Lower Arm Rubber Bushing | 2 | Type A, B and C
KDY5-34-470A can also be used | KD35-34-470C |
WARRANTY INFORMATION
NOTE:
- This warranty information applies only to verified customer complaints on vehicles eligible for warranty repair.
- This repair will be covered under Mazda
 ’s New Vehicle Limited Warranty term.
 - Additional diagnostic time cannot be claimed for this repair.
- Type A, B and C repairs have two different causal parts (front shock absorber and lower arm). Submit two separate claims.
Front Shock Absorber Repair (All Types)
| CX-5, Mazda6 | CX-5, Mazda6 | CX-3 | |
| Warranty Type | A | A | A |
| Symptom Code | 82 | 82 | 82 |
| Damage Code | 9A | 9A | 97 |
| Part Number Main Cause | KR27-34-38X | KR27-34-38X | 7777-SP-K08 |
| Quantity | 0, 1 or 2 | 0, 1 or 2 | 0 |
| Operation Number / Labor Hours | With front lower arm bushing replacement | Without front lower arm bushing replacement | XXL9PBRX / 0.9 Hrs. |
| XXK8NDRX / 0.6 Hrs. | XXKBKXRX / 0.9 Hrs. |
Front Lower Arm Repair (Type A, B and C)
| CX-5, Mazda6 | |
| Warranty Type | A |
| Symptom Code | 82 |
| Damage Code | 93 |
| Part Number Main Cause | KD35-34-470C or KDY5-34-470A |
| Quantity | 2 |
| Sublet Code | If Wheel Alignment Check and Adjust was performed outside of shop, claim the actual invoice amount with the sublet code “Z9”. |
| Operation Number / Labor Hours | Replace both lower arm bushings Select one applicable repair below |
| 1. Wheel Alignment Check & Adjust was performed outside of shop.
XXK8NARX, 0.8Hrs. 2. Wheel Alignment Check & Adjust was performed at dealer using 4-wheel alignment tester XXK8NBRX, 1.8Hrs. 3. Wheel Alignment Check & Adjust was performed at dealer using 4-wheel alignment tester with Wireless Type. XXK8NCRX, 1.4Hrs. |
02-010/16
07/21/2016
 Loading...
02-010/16
04/05/2016
 Loading...
02-010/16
03/10/2016
 Loading...
02-003/15
12/17/2015
 Loading...
02-003/15
02/04/2015
 Loading...
- ✅ ELIMINATES DIRT, BROWNING, AND BRAKE DUST - Which part of your car takes the biggest beating? Your wheels & Tires! Between the heat, elements, and constant brake contaminants your wheels are almost immediately dirty. Adam’s Wheel & Tire Cleaner is a specifically formulated chemical designed to target heavy brake dust and restore your tires back to factory color.
- ✅ SAFE ON MANY FINISHES - Safe on clear-coated, powder-coated, chrome, alloy, and painted wheels. Most wheel cleaners can be harmful to your wheel finish and dissolve more than what you wanted to clean off! Adam’s Polishes Wheel & Tire Cleaner gets to work fast and dissolves stubborn metallic contamination.
- ✅ GET RID OF BROWN TIRES - If you’re happy with brown, old and decrepit tires, look away! If you’re wanting to thoroughly clean your vehicle’s shoes and make them look like new again, then look no further! Adam's Wheel & Tire Cleaner contains a blend of alkaline-concentrated solvents and surfactants to create a high sudsing formula and removes silicones, greases, wax build-up, polymers, and any previously applied dressings to leave your tires and wheels looking new.
- ✅ EXTEND YOUR TIRE DRESSINGS LIFE - Adam’s Wheel & Tire Cleaner is a detailing essential for any user, from rookie to professional. When investing in premium protective options, high foaming soaps, and ultra-premium microfiber towels, your vehicle's shoes need to be kept clean to not take away from the rest of the vehicle. If you choose not to clean your tires, your tire dressings have no chance of sticking around. Clean your tires before with Wheel & Tire Cleaner to maximize your tire shine.
- ✅ 110% SATISFACTION GUARANTEE - At Adam’s, we strive to bring the BEST waxes, sealants, ceramic coatings, microfiber towels, wash mitts, garage tools, accessories, detailing kits, sponges, applicators and other high-quality car cleaning products to our customers. If you don’t agree & are not satisfied, let us know and we’ll do everything we can to make it right!
- TOUGH ON GRIME - Signature Series is a strong citrus-based wheel cleaner that is tough on brake dust and filth, but gentle and safe for most wheel finishes and materials.
- NATURAL CITRUS CLEANING POWER - Signature Series Wheel Cleaner is blended with natural citrus extracts for powerful cleaning of dirt, grime, and brake dust. Brake dust contains corrosive iron and carbon deposits that can destroy wheels.
- SUPER CONCENTRATED - Adding Signature Series to normal wheel cleanings reduces buildup and corrosion and protects a pristine showroom shine; Clean rubber tire sidewalls to ensure tire shine dressings last longer and look better!
- WE MAKE LOOKING GOOD EASY - Spray the cleaner directly onto alloy wheels, plastic wheel covers, brake parts, suspension parts, plastic fender liners, or undercarriage parts to break down caustic grime and filth.
- THE GO TO BRAND IN CAR CARE - Beginners and professionals alike choose Chemical Guys, not only for the finest car care products, but the world class customer support and vast detailing knowledge Chemical Guys is more than a brand it's a lifestyle with a worldwide following
- WHEELS TAKE A BEATING - KEEP THEM CLEAN - Constant heat, grime, and brake dust make wheels the dirtiest part of your car. Wheel cleaner dissolves stubborn brake dust, iron deposits, and road contaminants for a spotless finish.
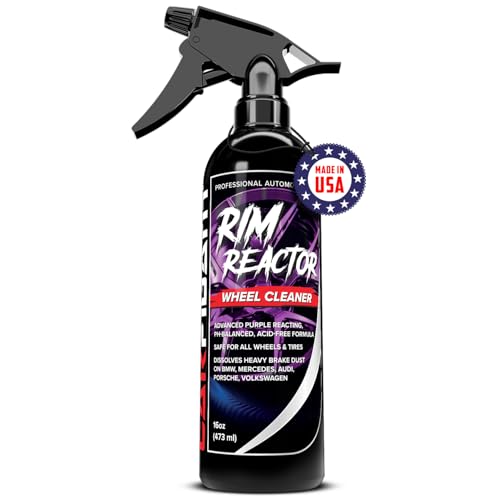
- COLOR-CHANGING FORMULA - WATCH IT WORK - Our pH-balanced, non acid wheel cleaner reacts with iron deposits, turning purple as it breaks down stubborn brake dust and metallic contamination.
- SAFE FOR ALL WHEELS & FINISHES - NO DAMAGE, NO STAINS - Our pH-balanced, non acid formula is tough on grime but gentle on aluminum, chrome, steel, and painted wheels. Cleans thoroughly without stripping coatings or damaging finishes.
- FAST-ACTING FORMULA – Simply spray on, wait 2–4 minutes, and rinse off — no scrubbing needed for most applications. Perfect for DIY car detailing or professional car washes, especially on moderately contaminated wheels.
- POWERFUL WHEEL & TIRE CLEANER SPRAY - Rim Reactor dissolves brake dust, road grime, and iron fallout in seconds. Safe for all car wheels and rims, including performance cars that generate excessive brake dust.
- Powerful Brake Dust Removal: Cuts through tough brake dust, grime, and road contaminants with ease. This high-performance cleaner is designed to lift away embedded dirt and iron buildup, restoring your wheels to a factory-fresh look
- Safe for All Wheels & Finishes: The non-acid formula makes it safe for chrome, aluminum, painted, powder-coated, and steel wheels. Get a deep clean without worrying about damage or discoloration
- Foaming Action for Maximum Cleaning: Use it straight from the bottle or dilute it in a foam sprayer to create a thick, clinging foam that lifts dirt and debris for effortless rinsing. The foaming action penetrates into hard-to-reach areas for thorough cleaning
- Restores & Protects: Not only does Brake Buster remove stubborn contaminants, but it also leaves behind a protective coating to help repel future grime, brake dust, and oxidation—keeping your wheels cleaner for longer
- Professional-Grade Performance: Trusted by detailing professionals and part of the Renny Doyle Double Black Collection, this wheel cleaner delivers pro-level results for enthusiasts and pros alike. Perfect for daily drivers, off-road rigs, and show cars

- ALUMINUM WHEEL CLEANER: Meguiar’s safest, least-aggressive cleaner is designed specifically for uncoated aluminum and other sensitive materials
- EFFECTIVE FOAMING ACTION: Our Extreme Cling foam grabs the wheel’s surface to effectively and gently dissolve dirt, brake-dust buildup and road grime
- VERSATILE USE: Safely and effectively cleans uncoated polished aluminum, as well as alloy, anodized and powder-coated wheels
- ULTRA-SAFE: Gentle cleaning agents won’t harm wheels or brake components
- IDEAL FOR AFTERMARKET: The ideal choice for aftermarket wheels that often have sensitive and delicate surfaces
- Triple-Action formula dissolves grease, road grime and brake dust
- Intense foaming action clings to wheels and lifts away the most stubborn soils
- Blanketing agent helps formula spread into nooks and crannies to attack tough dirt
- Safe for factory and aftermarket coated wheels when used as directed
- Reveals brilliant shine
- Safe On All Factory Installed Wheels: Acid-Free, Ph Balanced Formula Won'T Damage Wheels, Safe On Various Wheel Finishes Including: Chrome, Aluminum, Steel, Clear Coated, Pvd, Painted, Plastic Wheel Covers, And Magnesium
- Watch It Work: The Color Changing Formula Activates When It Comes In Contact With The Ferrous Metals (Iron) From Brake Dust Or Other Dirt And Grime. Full Effect Sprays On Fluorescent Yellow, Then Turns Deep Red Or Purple As It Dissolves Brake Dust
- Advanced And Effective Chemistry: Full Effect, Non Acid Wheel Cleaner Attaches And Emulsifies Stubborn Baked On Brake Dust. Simply Spray On, Let It Dwell, Watch For Color Change, Agitate If Necessary, And Rinse With Water. *For Best Results Rinse Using High Pressure Water
- Full Effect Is Great For Both The Diy (Do-It-Yourself) And The Professional. Effortlessly Achieve Shining Wheels That Will Make Your Vehicle Look Like It Just Rolled Off The Showroom Floor
- Powerful Cleaning - Removes embedded iron particles, brake dust, and road contaminants extending the life of car paint and providing a deeper clean that car wash cannot tackle alone
- Safe For All Surfaces - This pH neutral and acid free formula can be used on exterior painted surfaces, clear coat finishes, polished metal, chrome, glass and all wheels perfect for cars, SUVs, RVs, motorcycles and marine
- Rapid Response Reaction - Color changing formula turns from clear to purple when in contact and during the removal of embedded iron contaminants
- Scent Neutralizer - Industries first Iron remover that effectively blocks the chemical odor from iron removing chemistry making a more pleasant user experience
- Easy Application - Apply to a cool, dry surface and spray enough product to thoroughly cover, let sit for 2-4 minutes, remove with a powerful stream of water and towel dry (for heavy contamination agitation may be required)
- FOAMING CLEANER FOR YOUR WHEELS & RIMS - Oxygen-infused cleaners and slick lubricants in Diablo Wheel Gel form a foaming lather to lubricate surfaces and gently guide dirt and grime off of your wheels for the gentlest and most thorough clean available!
- WASH AWAY HARMFUL BRAKE DUST & ROAD GRIME - Diablo Gel Wheel And Rim Cleaner lifts away stuck-on brake dust and grime with concentrated suspension technology! Tackle the toughest dirt and debris the road throws at your wheels with this advanced cleaner!
- PRESERVE YOUR SENSITIVE WHEEL & RIM FINISHES - Brake dust and road filth are not just ugly, they will destroy your wheels if left unchecked! Diablo wheel gel removes abrasive and corrosive particulates before they can damage your sensitive wheel finishes!
- SAFELY CLEAN ANY TYPE OF WHEEL WITHOUT SCRATCHING - Unlike other wheel cleaners, Diablo Wheel Gel uses no caustic acids or heavy alkaline compounds and won’t harm your shiny wheel finishes while your clean! The advanced foaming formula safely lifts dirt and grime to help prevent scratches and swirls!
- NON-CAUSTIC FORMULA WON’T HARM OTHER CAR PARTS - Diablo Wheel Gel is gentle, non-caustic, and safe to use around any other car part in the vicinity of the wheel! Simply rinse off any overspray without any fear of etching or staining any other cart parts!
Last update on 2025-04-22 / Affiliate links / Images from Amazon Product Advertising API
This product presentation was made with AAWP plugin.





I have a cx3 2017 model dynamic 2,0litre auto, also have a bad noise on front left shock absorber when taking any bumps on the road, vehicle was just back from service and both sides coil protectors where installed but the noise is bad now on left front side, booked in to dealer Barloworld PMB next week, will see what happens??
This has also been an issue with my mazda3 as well as creaking straining noises from my accelerator and knocking while breaking
GOOD MORNING SIRS,
REGARDING TO YOUR REPORT “Knocking Squeaking Noise From Front – 2013-2016 Mazda”, I HAVE A MAZDA CX5 ASSEMBLED 2015 / MODEL 2016 AND I ALSO DETECTED THE KNOCKING NOISE IN THE FRONT SHOCK ABSORVER, SPECIALLY WHEN I CROSS OVER SPEED BUMP. I WOULD LIKE TO KNOW WHAT FIXES SHOULD BE DONE TO MY VEHICLE TO ASK MY DEALER. MY VEHICLE VIN NUMBER: JM8KE4W77G0352509.
I WOULD APPRECIATE YOUR SUPPORT. THANKS IN ADVANCE.
MARCEL SANTOS
Are this already solve it, my cx5 also have similar issue