| “This site contains affiliate links for which OEMDTC may be compensated” |
2013-2014 CX-5 – HOOD VIBRATION WHILE DRIVING AT HIGHWAY SPEED
APPLICABLE MODEL(S)/VINS
2013-2014 CX-5 vehicles with VINs lower than JM3KE******387092 (produced before September 1, 2013)
Hood vibrates when driving at speeds of 110 Km/h (68 mph) or more.
The amount of sealant used to fill in the space between the inner frame and outer panel at the bottom area of the hood is insufficient.
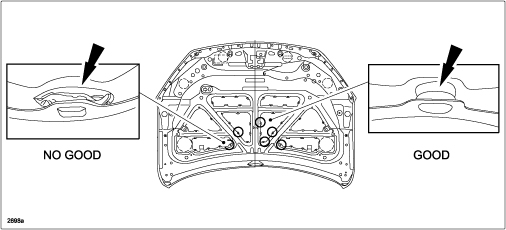
If the sealant detaches (as shown below on the left), it may cause the hood to vibrate.
The amount of sealant has been increased during vehicle production and the preload force of the cowl grill seal has been increased to eliminate the concern.
REPAIR PROCEDURE
The cowl grill seal will be replaced with a modified part, additional dampening material may be applied between the hood’s inner frame and outer panel and the hood height may be adjusted to apply additional tension.
NOTE:
- This repair should be performed by a qualified technician or body shop.
- DO NOT use any other products for this repair, such as panel bonding glue, which is too strong for this type of repair.
- Open the hood and secure it with the support rod.
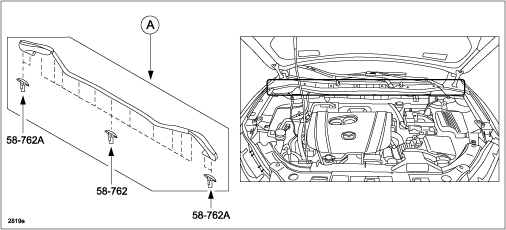
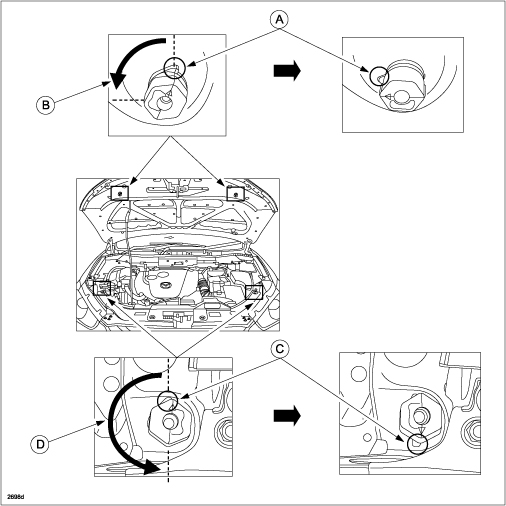
- Replace the cowl grill seal (A) with a modified one with increased preload force.
NOTE: The cowl grill seal is attached to the cowl grill with 15 clips.
- Inspect if the factory applied sealant between the outer panel and the inner frame at the back of the hood is separated.
- If the sealant is separated, go to step 4.
- If the sealant is not separated, go to step 20.
- Remove the hood insulator according to the MS3 online instructions or the Workshop Manual (section 09-10).
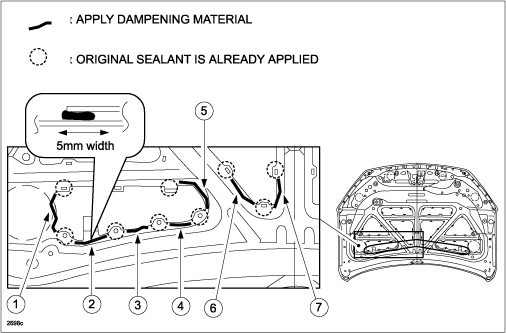
- Confirm the ten (10) original sealant spots at the bottom area of the hood.
NOTE:
- Additional dampening material will be applied between these ten (10) original sealant spots.
- It is not necessary to apply dampening material to other areas of the hood. Even if the original sealant has become detached, it will have no influence on the hood vibration concern.
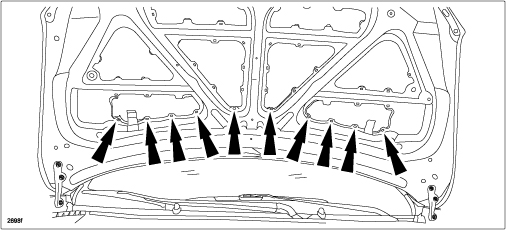
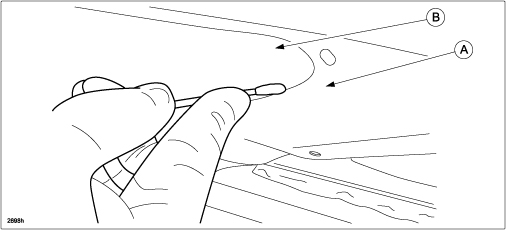
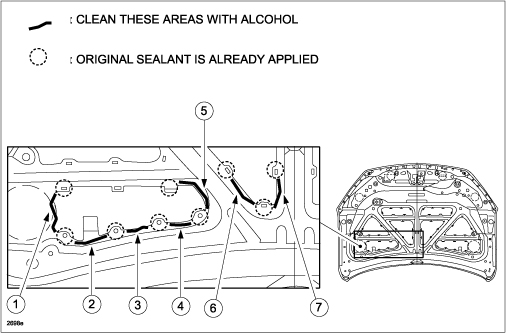
- Using alcohol (of at least 50% content) and cotton swabs (or equivalent), thoroughly clean the fourteen (14) areas (shown below) between the hood’s inner frame (A) and outer panel (B).
NOTE: There are seven (7) areas on the left side of the hood and seven (7) areas on the right side of the hood to be cleaned (left side shown below).
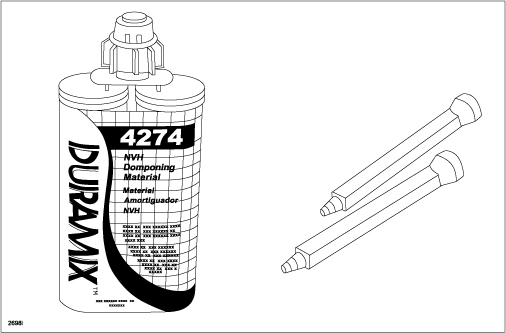
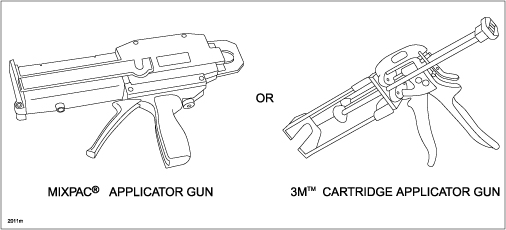
- Locally obtain the following materials to perform the repair:
NOTE: Either applicator gun can be used, however, the 3M cartridge applicator gun is normally less expensive than the Mixpac applicator gun.
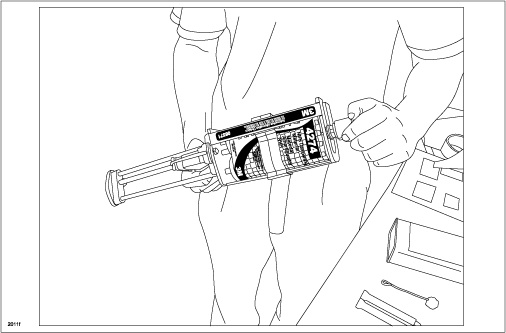
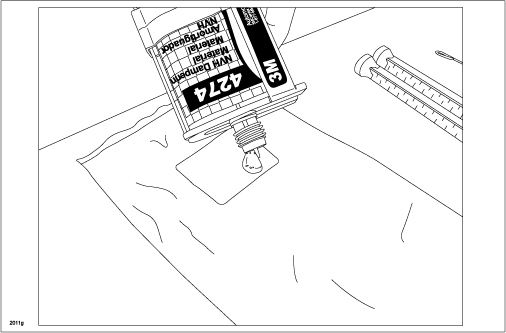
- Insert Duramix NVH Dampening Material (04274) into applicator gun and remove the cap and insert.
NOTE: Do not discard the cap or insert.
- Begin squeezing the applicator gun trigger until clear dampening material starts to come out of one side.
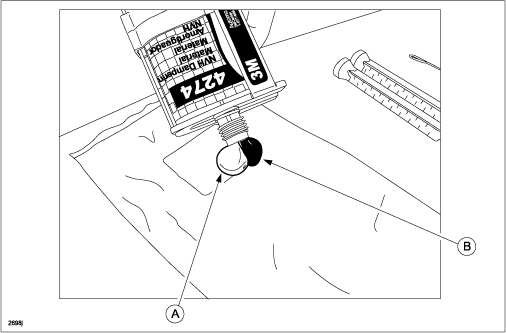
- Continue squeezing the trigger until dampening material (A) and hardener (B) come out equally.
NOTE: This ensures dampening material and hardener are correctly mixed and will harden properly.
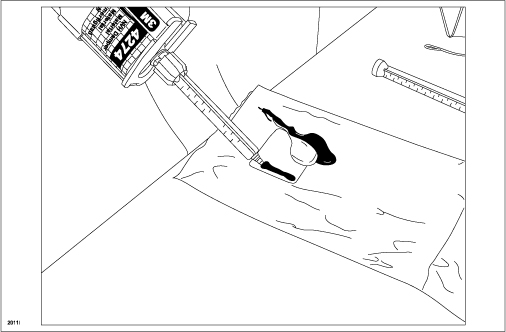
- Insert the mixing nozzle onto the tip of the dampening material, then screw in the removed cap and tighten.
- Squeeze the trigger until a small amount of material comes out.
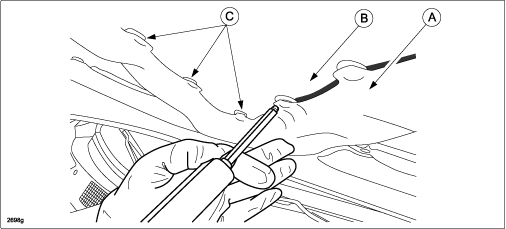
- Apply a 5 mm wide bead of dampening material by pushing and filling it into the space between the inner frame (A) and outer panel (B) between the original sealant spots (C).
NOTE: It is recommended that a pair of protective rubber gloves be put on before applying the dampening material.
NOTE:
- Ensure the dampening material adheres to the inner frame and outer panel.
- Dampening material must be applied to a total of fourteen (14) locations, (seven (7) on the left and seven (7) on the right sides of the hood) as shown below.
- It is not necessary to apply dampening material over the original sealant spots, even if the original sealant has become detached.
NOTE:
- One (1) Duramix NVH Dampening Material (04274) contains enough material to repair two (2) vehicles.
- Any dampening material run-off should be removed.
- Remove and discard the mixing nozzle.
- Reinstall the insert and cap onto the dampening material.
- Once the repair has been completed, leave the hood open and allow the dampening material to dry for at least six (6) hours when applied in ambient temperatures of 70 degrees F (21 degrees C).
NOTE:
- DO NOT press on the outer side of hood while the dampening material is drying.
- DO NOT slam hood closed while the dampening material is drying. It could break the bond.
- Adjust the hood height by turning the rubber stoppers on the hood (2 stoppers) and body side (2 stoppers).
- After the dampening material has completely dried, close the hood and check the clearance between the hood and both front fenders according to the Body Shop Manual [CONSTRUCTION STANDARD VALUES].
- Reinstall the hood insulator according to the MS3 online instructions or the Workshop Manual (section 09-10).
- Road test the vehicle to verify the hood vibration has been eliminated.
PART(S) INFORMATION
| Part Number | Description | Qty. | Notes |
| KD53-56-760A | Cowl grill seal | 1 | — |
| 04274 | Duramix NVH Dampening Material – 6.25 fl. oz. (200 ml.) | 1 | Includes two (2) mixing nozzles |
| 08571 | 3M Cartridge Applicator Gun | 1 | — |
| 08117 | MixPac Applicator Gun | 1 | — |
| 08193 | Automix Mixing Nozzle | 1 | Order replacement nozzles as necesssary. Includes six (6) nozzles |
- 3M General Support: (800) 524-6429
- 3M Technical Support: (877) 666-2277
- 🚖Securely Fixing Car Hood:Hood pins can help your car hood close perfectly. When facing bumpy roads, the hood can minimize vibration to the greatest extent. To provide you with a safe and comfortable driving environment.
- 🚖Common to Most Car Models:The thread length at the bottom of the hood pin is 4.14 inch and the diameter is 2 1/2 inch. The length of the racing lanyard in the hood pins kit for car is 24 inch. It is suitable for the modification and use of engine covers for most cars, trucks, and SUVs on the market.
- 🚖Excellent Material:We choose premium stainless steel as the raw material for this engine hood pins for truck, aiming to provide you with high-strength, rust resistant, firmly, and durable quality assurance.
- 🚖What You Can Expect to Receive:The packaging contains 2x threaded pins, 2x hooks, 4x nuts, 2x washers, 2x racing lanyard, and 8x small screws. During installation, be careful not to overtighten the hood pin to prevent it from warping.
- 🚖Perfect After-Sales Service:We care about our valued buyers, and each of our hood pin is carefully tested and inspected before delivery. If you have any questions, our customer service staff will be happy to help you.
- ★Build to Last: Made of high-quality steel with bending, welding, polishing, pickling, phosphating, and spraying processes, the product is highly resistant to impact, wear, corrosion, rust, and abrasion.
- ★Rotating Design: The stand can rotatable 0-180° to adapt to your different work situations and needs, making your painting operation more convenient and flexible.
- ★Strong Structure: The thick steel tubes and strong bases with triangular brackets allow the product to hold the workpieces without easily shaking, ensuring better painting results.
- ★Easy to Move: It is equipped with 4 wheels so you can easily move the product. Two of them come with brakes that can stop the product firmly in place without shaking or sliding.
- ★Simple Assembly: The English assembly manual and complete accessories in the package allow you to easily assemble it.
- [Vehicle Fitment]: Compatible with all of Cars & Trucks,hood,trunk lid,hatchbacks,repair work, any support points,etc.
- [Specifications]: ① Location: Front; ②Length:17-44.5inch; ③Washable: Yes; ④Reusable: Yes; ⑤ Package Quantity: 1; ⑥ Packaging Type: Box.
- [Enhanced Performance]: Holds Strong,not slip,Space-Saving storage,rubber tips on both ends,easy to extend and retract.
- [Durable and Reliable]: Three-stage, telescoping design, Fail Safe Hood prop, Lots of uses and will never let you down.
- [Customer Support]: 1 Year Quality Guarantee; Being brand-new and sturdy.We extremely value your satisfaction and strive to provide you good shopping exprience. Any further question, please feel free to contact us at any time.
- [Feel Professional in Your Garage]: Rebuild or repair your vehicle with ABN Mechanics Fender Cover Protector; Attach to your car hood to hold your tools safely
- [Protect Your Expensive Paint]: Fender covers for boats have a felt backing to prevent vinyl from sticking or your tools scratching your boat or car; Avoid greasy stains using the car repair mat blanket
- [Made to Last]: Protected from climate and outside debris, but most importantly oil, fender protector for mechanics is durable to withstand multiple uses without tearing; Fender blanket cleans easily with wet cloth and mild soap
- [Sized to Fit]: Measuring 34.3 by 25.6 inches (87.1 x 65cm), engine bay mat fits most car hoods; Magnetic toolpad has a thickness of 0.1-inch (0.3cm) to fold up for easy storage
- [Easy to Use]: 4 strong magnets line the top of auto fender protector mechanic pad to attach to the hood or side of your automobile; Fender pad magnets can also hold tools and bolts in place
- For covering and protecting fenders from damage caused by tools or belt buckle when working on vehicle
- Durable vinyl exterior with soft inner liner
- Dimensions: 24 inch x 35 inch
- Special pleated double top ridge helps to hold cover in place while keeping tools secure
- Built to exceed tool standards
- Versatile Applications: With different hooks on each end to apply various tensile repairs, this tool is very useful for removing dents on bodywork, bumpers, hoods, hulls, decks and other parts. From minor dents to major bodywork, this tool handles it all with ease, making it indispensable for auto body shops and DIY enthusiasts alike
- Precision Performance: Crafted with utmost precision, this pulling stick tool ensures accurate adjustments and more leverage by adjusting the chain length during car repairs. The two welded hooks on the pole enable pulling from any direction
- Durable Construction: Built to withstand the rigors of regular use, the pulling stick boasts a robust construction, ensuring longevity and reliability in any repair scenario. It is strong and not easy to deform and can apply good pulling force
- User-Friendly Design: Bar length-52", chain length-6'. Engineered for convenience, its ergonomic design provides a comfortable grip and intuitive operation
- Usage Instruction: First, attach the chain to the rod hook securely. Then, select suitable hooks at both ends of the chain and fasten them to the dent position. Next, place the base of the pull rod in a stable support spot. Grip the handle firmly and pull steadily to lift the dent. Repeat until the surface is smooth to complete the repair
Last update on 2025-05-08 / Affiliate links / Images from Amazon Product Advertising API
This product presentation was made with AAWP plugin.
