| “This site contains affiliate links for which OEMDTC may be compensated” |
| Subject:
CHECK ENGINE LIGHT AND A/T WARNING LIGHT ON WITH ONE OR MORE OF THESE DTCS (P0842, P0847, P0872, P0877, P0780, P1738) STORED IN TCM MEMORY | Bulletin No: 05-005/16 |
| Last Issued: 07/07/2016 |
BULLETIN NOTE
This bulletin supersedes the previously issued bulletin(s) listed below. The changes are noted below in Red beside the change bars.
| Previously Issued TSBs: | Date(s) Issued |
| 05-002/15 | 12/03/15, 10/07/15, 05/27/15, 04/24/15, 03/30/15, 03/26/15 and 03/10/15 |
| 05-005/14 | 04/29/14, 04/09/14, 03/28/14, and 3/25/14 |
| 05-003/14 | 04/04/14 and 02/21/14 |
| 05-005/13 | 109/23/13, 9/25/13,12/16/13, and 12/17/13 |
APPLICABLE MODEL(S)/VINS
2012-2013 Mazda3 with SKYACTIV 6AT
2014-2016 Mazda3 with SKYACTIV 6AT (Japan built – VINS starting with JM1)
2014-2016 Mazda3 with SKYACTIV 6AT (Mexico built – VINS starting with 3MZ)
2013-2016 CX-5 with SKYACTIV 6AT
2014-2016 Mazda6 with SKYACTIV 6AT
Check engine light and automatic transaxle warning light ON with one or more of these DTCs stored in the TCM memory (P0842, P0847, P0872, P0877, P0780, P1738).
- P0842:00 – Oil pressure switch No. 1 (oil pressure switch B) stuck on
- P0847:00 – Oil pressure switch No. 2 (oil pressure switch A) stuck on
- P0872:00 – Oil pressure switch No. 3 (oil pressure switch A) stuck on
- P0877:00 – Oil pressure switch No. 4 (oil pressure switch B) stuck on
- P0780:00 – Gear shifting malfunction
- P1738:00 Automatic transaxle internal malfunction
DESCRIPTION
Some vehicles may experience the check engine light and automatic transaxle warning light ON with one or more of these DTCs stored in the TCM memory (P0842, P0847, P0872, P0877, P0780, P1738).
- P0842:00 – Oil pressure switch No. 1 (oil pressure switch B) stuck on
- P0847:00 – Oil pressure switch No. 2 (oil pressure switch A) stuck on
- P0872:00 – Oil pressure switch No. 3 (oil pressure switch A) stuck on
- P0877:00 – Oil pressure switch No. 4 (oil pressure switch B) stuck on
- P0780:00 – Gear shifting malfunction
- P1738:00 Automatic transaxle internal malfunction
This is caused by the oil pressure switch A and/or B at the control valve body temporarily or permanently getting stuck due to contamination entering the passage. To correct the problem, some mass production changes have been implemented to reduce contamination and improve the DTC diagnostic logic.
NOTE: If the vehicle also has a delayed engagement concern, this TSB is not applicable. Refer to MS3 online instructions or Workshop Manual for proper diagnosis and repair procedure.
Customers having this concern should have their vehicle repaired using the following repair procedure.
REPAIR PROCEDURE
- Check for DTCs.
- If any of the DTCs (P0842, P0847, P0872, P0877, P0780, P1738) is stored in TCM memory, go to step 3.
- If any other DTCs are present or no DTCs are present, perform Workshop Manual troubleshooting.
- If the vehicle is in the applicable VIN range listed below, proceed to TCM Reprogramming.” Otherwise, proceed to “Parts Replacement.”
2012-2013 Mazda3 JM1BL******500001 – 999999
2014-2016 Mazda3 JM1BM******100001 – 299999 (Japan built)
2014-2016 Mazda3 3MZBM******100001 – 199999 (Mexico built)
2014-2016 Mazda6 JM1GJ******100001 – 299999 (except Mexico spec)
2013-2016 CX-5 JM3KE******100001 – 599999 (except Mexico spec)
NOTE:
- If the concern has occurred with older TCM file, parts replacement is not necessary.
- If the concern has occurred with new TCM file, proceed to Parts Replacement.
- If the new TCM file for the vehicle is TBD, proceed to Parts Replacement.
TCM Reprogramming
- Reboot the IDS to clear memory before reprogramming.
- Using IDS 100.5 or later software, reprogram the TCM to the latest calibration (refer to “Calibration Information” table) by following the “Module Reprogramming” procedure.
NOTE:
- Always update the IDS tool first, then follow on-screen instructions to download the needed calibration file for TCM reprogramming.
- It is not necessary to remove any fuses or relays during TCM reprogramming when the IDS screen prompts you to do so. You may accidentally stop power to one of the TCM terminals and cause the TCM to be blanked, or you may receive error messages during the IDS reprogramming procedure.
- IDS shows the calibration part numbers after programming the TCM.
- Please be aware that TCM calibration part numbers and file names listed in any Service Bulletin may change due to future releases of IDS software, and additional revisions made to those calibrations for service related concerns.
- When reprogramming a TCM, IDS will always display the “latest” calibration P/N available for that vehicle. If any calibration has been revised/updated to contain new information for a new service concern/issue, it will also contain all previously released calibrations.
- Start/Stop button vehicles only: DO NOT press the start/stop button during the reprogramming process.
- When performing this procedure, we recommend using the “Power Supply” mode in the Battery Management System to keep the vehicle battery up to capacity. If a different charger is used, make sure it does not exceed 20 AMPS. If it exceeds 20 AMPS, it could damage the VCM.
- After performing the TCM reprogramming procedure, verify the repair by starting the engine and making sure there is no Check Engine Light or abnormal warning lights present.
NOTE:
- If any DTCs should remain after performing DTC erase, diagnose the DTCs using MS3 online instructions or Workshop Manual section 01-02.
- After TCM reprogramming, it is no longer necessary to road test the vehicle to “relearn” KAM (Keep Alive Memory).
- Perform “Initial Learning” according to the instructions on MS3 online or the Workshop Manual (section 0517 INITIAL LEARNING [FW6AEL, FWAX-EL])
Parts Replacement
NOTE: Proceed with Parts Replacement only if concern re-occurs after TCM reprogramming for applicable vehicles.
- Remove the oil pan from the transaxle according to the instructions on MS3 online or the Workshop Manual (section 05-17 CONTROL VALVE BODY REMOVAL/INSTALLATION [FW6AEL, FWAX-EL]).
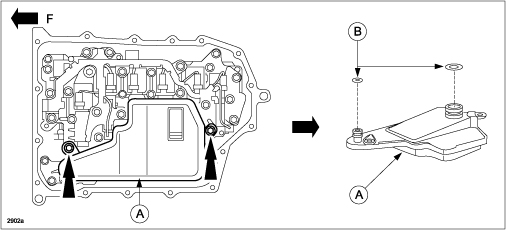
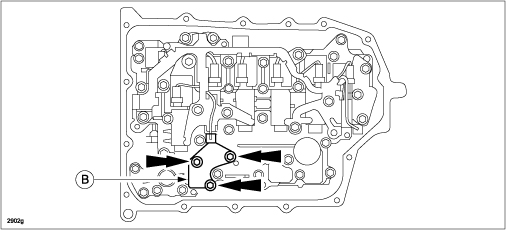
- Remove the oil strainer (A) and the oil strainer O-rings (B) from the transaxle. F=Front of vehicle
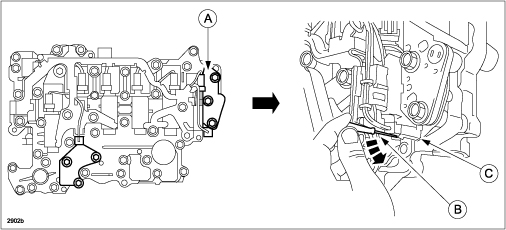
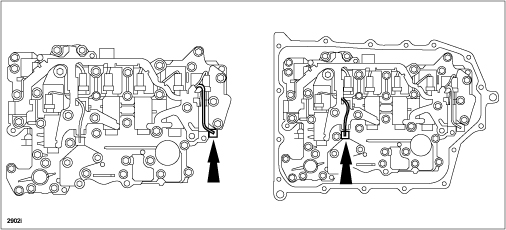
- Remove oil pressure switch A.
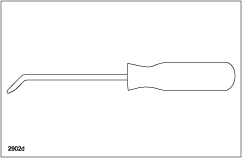
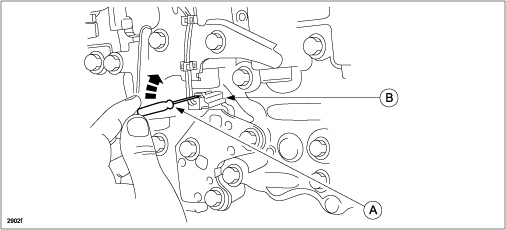
a. At oil pressure switch A, insert a precision flathead screwdriver (B) and move it in the direction of the arrow in the figure to disconnect the oil pressure switch A connector (C).
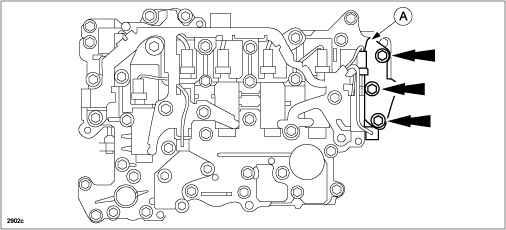
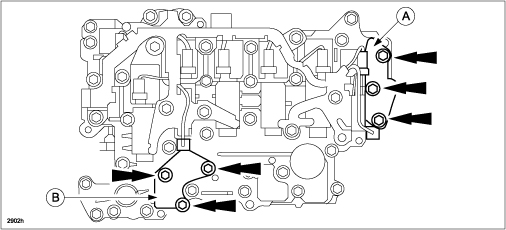
b. Remove the bolts for oil pressure switch A.
c. Detach the tab shown and remove oil pressure switch A from the control valve body.
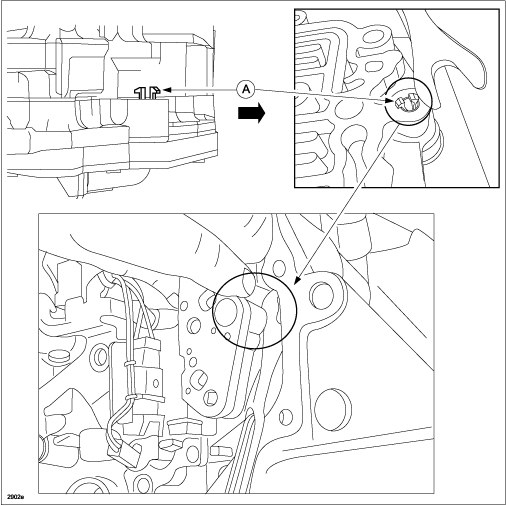
1. Using an appropriate tool (such as a fastener remover), push the tab (A) of oil pressure switch A.
CAUTION: If the tab is broken during removal, make sure to remove the broken pieces.
- Pull out oil pressure switch A by shaking it.
CAUTION: When removing oil pressure switch A, be careful not to damage the transaxle fluid temperature (TFT) sensor harness nearby.
- Remove oil pressure switch B.
a. Insert a precision flathead screwdriver (A) and move it in the direction of the arrow as shown to discon-nect the oil pressure switch B connector.
b. Remove oil pressure switch B.
- Install new oil pressure switches A and B.
- Verify that the tab of each oil pressure switch (A and B) is attached correctly.
- Install the bolts for oil pressure switches A and B.
Tightening torque: 9-10 N•m {92-101 khf•cm, 80-88 in•lbf}
- Connect the oil pressure switch A and oil pressure switch B connectors.
- Install the oil strainer with new oil strainer O-rings according to the instructions on MS3 online or the Workshop Manual (section 05-17 CONTROL VALVE BODY REMOVAL/INSTALLATION [FW6AEL, FWAX-EL]).
NOTE: If there is a large amount of foreign material at the bottom of the oil pan, replace the oil strainer with a new one.
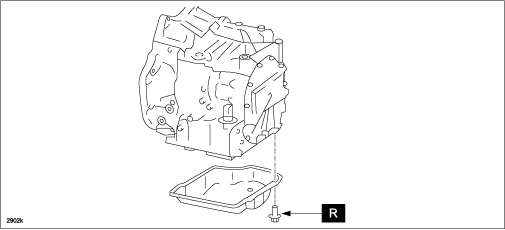
- Install the oil pan according to the instructions on MS3 online or the Workshop Manual (section 05-17 CONTROL VALVE BODY REMOVAL/INSTALLATION [FW6AEL, FWAX-EL]).
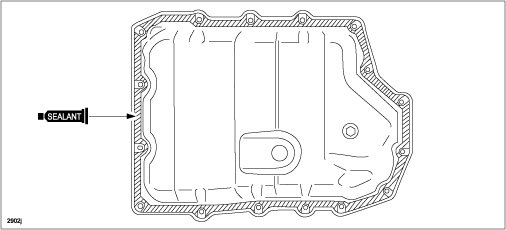
CAUTION: Clean any remaining silicone sealant off the contact surfaces of the transaxle case and oil pan.
a. Apply a light coat of silicon sealant to the contact surfaces of the oil pan and transaxle case.
b. Install the oil pan with new bolts before the applied sealant starts to harden.
Tightening torque: 8-10 N•m {82-101 khf•cm, 71-88 in•lbf}
- Install the removed parts.
- Add ATF according to the instructions on MS3 online or the Workshop Manual (section 05-17 AUTOMATIC TRANSAXLE FLUID (ATF) REPLACEMENT [FW6A-EL] ).
- Connect the negative battery cable.
- Perform the Initial Learning Procedure. Refer to MS3 online instructions or Workshop Manual section 05-17.
- Perform the Mechanical System Test. Refer to MS3 online instructions or Workshop Manual section 05-17.
- Verify repair.
CALIBRATION INFORMATION
2012-2013 Mazda3
| TCM File Name | Production Date Range |
| PEY0-21PS1-A | Before March 31, 2013 |
| PE08-21PS1-N | After March 31, 2013 |
2014-2015 Mazda3 (US spec)
| TCM File Name | Engine | i-ELOOP | VIN |
| PE5B-21PS1-D | PE (2.0L) | without | JM1 (Japan built) |
| PEDB-21PS1-B | with | ||
| PY2S-21PS1-D | PY (2.5L) | with | |
| PEAR-21PS1-A | PE (2.0L) | without | 3MZ (Mexico built) |
2013 CX-5 (US spec)
| TCM File Name | Drive | Kickdown Switch | Production Date Range |
| PEX3-21PS1 (*1) | 2WD | without | Before March 31, 2013 |
| PE02-21PS1-J | After March 31, 2013 | ||
| PEX1-21PS1-A | Service part after August 1, 2013 | ||
| PEY1-21PS1-A | with | Before March 31, 2013 | |
| PEAS-21PS1-C | After March 31, 2013 | ||
| PEX3-21PS1 (*2) | 4WD | without | Before March 31, 2013 |
| PE1B-21PS1-J | After March 31, 2013 | ||
| PEX2-21PS1-A | Service part after August 1, 2013 | ||
| PEY2-21PS1-A | with | Before March 31, 2013 | |
| PEAT-21PS1-C | After March 31, 2013 |
NOTE:
- (*1): Older version is PE02-21PS1-G.
- (*2): Older version is PE1B-21PS1-G.
2014-2015 CX-5 (US spec)
| TCM File Name | Engine | Drive | Production Date Range |
| PEY5-21PS1-A | PE (2.0L) | 2WD | Before March 31, 2013 |
| PE1H-21PS1-D | After March 31, 2013 | ||
| PEY6-21PS1-A | 4WD | Before March 31, 2013 | |
| PE1K-21PS1-D | After March 31, 2013 | ||
| PYY0-21PS1-B | PY (2.5L) | 2WD | Before March 31, 2013 |
| PY09-21PS1-H | After March 31, 2013 | ||
| PYY1-21PS1-B | 4WD | Before March 31, 2013 | |
| PY2W-21PS1-F | After March 31, 2013 |
Mazda6 (US spec)
| TCM File Name | i-ELOOP | Production Date Range |
| PYY3-21PS1-B | without | Before March 31, 2013 |
| PY1E-21PS1-H | After March 31, 2013 | |
| PY1T-21PS1-C | with | — |
2014-2015 Mazda3 (Mexico spec)
| TCM File Name | Engine | VIN |
| PY8F-21PS1-B | PY (2.5L) | JM1 (Japan built) |
| PEGS-21PS1-A | PE (2.0L) | 3MZ (Mexico built) |
| PEDE-21PS1-A |
2013 CX-5 (Mexico spec)
| TCM File Name | Engine | Drive |
| PE2T-21PS1-F | PE (2.0L) | 2WD |
| PE2V-21PS1-F | 4WD |
2014-2015 CX-5 (Mexico spec)
| TCM File Name | Engine | Drive | Production Date Range |
| PEZ7-21PS1-A | PE (2.0L) | 2WD | Before March 31, 2013 |
| PE2P-21PS1-E | After March 31, 2013 | ||
| PEZ8-21PS1-A | 4WD | Before March 31, 2013 | |
| PE2R-21PS1-E | After March 31, 2013 | ||
| PYZ0-21PS1-B | PY (2.5L) | 2WD | Before March 31, 2013 |
| PY5L-21PS1-F | After March 31, 2013 | ||
| PYZ1-21PS1-B | 4WD | Before March 31, 2013 | |
| PY5M-21PS1-F | After March 31, 2013 |
Mazda6 (Mexico spec)
| TCM File Name | Production Date Range |
| PYY7-21PS1-B | Before March 31, 2013 |
| PY4K-21PS1-D | After March 31, 2013 |
PART(S) INFORMATION
| Description | Qty. | Notes | Part Number |
| Switch A | 1 | — | FZ01-21-2C0 |
| Swtich B | 1 | — | FZ01-21-2J0 |
| Bolt | 16 | Replace part | 9YA0-10-615A |
| O-ring | 1 | Replace part | FZ01-21-031 |
| O-ring | 1 | Replace part | FZ01-21-032 |
| Plug | 1 | Replace part | FU31-19-423 |
| Drain Packing | 1 | Replace part | 9956-41-400 |
| Oil Strainer | 1 | Replace if needed. FZ01-21-031 and FZ01-21-032 (O-rings) are included with this part. | FZ01-21-500 |
WARRANTY INFORMATION
NOTE:
- This warranty information applies only to verified customer complaints on vehicles eligible for warranty repair.
- This repair will be covered under the following Warranty terms:
- Oil pressure switch replacement – Powertrain Limited Warranty / CA PZEV Emission Warranty where applicable
- TCM reprogramming – Federal Emission Warranty (long term) / CA PZEV Emission Warranty where applicable
- For vehicles sold and registered in Mexico – New Vehicle Warranty
- Additional diagnostic time cannot be claimed for this repair.
| Oil Pressure Switch A and B Replacement | TCM Reprogramming (includes initial learning) | |
| Warranty Type | A | |
| Symptom Code | 6X | |
| Damage Code | 9W | |
| DTC | P0842, P0847, P0872, P0877, P0780, P1738 | |
| Part Number Main Cause | FZ01-21-2C0 | 5555-RP-TCM |
| Quantity | 1 | 0 |
| Operation Number / Labor Hours: | XXK43ARX / 1.8 Hrs. | XXK43CFX / 0.3 Hrs. |
05-005/16
 Loading...
05-002/15
12/03/2015
 Loading...
05-002/15
10/07/2015
 Loading...
05-002/15
05/27/2015
 Loading...
05-002/15
04/24/2015
 Loading...
05-002/15
03/30/2015
 Loading...
05-002/15
03/26/2015
 Loading...
05-002/15
03/10/2015
 Loading...
Mazda Reprogramming
Mazda Reprogramming
MDSFA/MMP Required Hardware (Not Included)
As shown in the diagram, an SAE J2534 pass-thru device is required to use the application.
Hardware validated by Mazda can be purchased separately from a third-party supplier. Validation has been done using the following J2534 pass-thru device and cables:
- CarDAQ+ (includes RS232 and Ethernet cables)
- Cable between CarDAQ and Vehicle – CD2534-J1962-FEPS (Sold separately / Required)
Important Information: Mazda makes no representations about the performance of third-party passthru devices. This pass-thru device list is provided voluntarily and as a courtesy. While our software meets SAE J2534, the pass-thru device manufacturer is responsible for making sure their pass-thru device operates properly on each Mazda
 vehicle and with Mazda
 software. We have listed the devices below because their manufacturers have attested that the tools have been validated to work. From time to time, we may test these devices. If we determine they do not operate properly or are obsolete, we may remove them from the list, without notice. Additionally, pass-thru devices listed here have been listed for their use with Mazda
 North American products only. While they may work with some European and other vehicles, they may not meet the requirements for those regions or operate properly.
Hardware can be purchased from a third-party supplier. Mazda has validated the following J2534 passthru devices:
| **J2534 Pass-thru Device | Manufacturer |
| *CarDAQ+ | Drew Technologies Inc. |
| *Pass-Thru+XS | Actia Corp. |
| *Snap-On Pass Thru Pro II | Snap-On. |
| *Universal Reprogrammer | EASE Diagnostics |
| *FLASH2 All-Makes Reprogrammer | CARDONE Industries |
| *Bosch Mastertech VCI | Bosch Diagnostics |
*Contact the device manufacturer for the latest DLL and firmware versions.
**Many J2534 manufacturers sell and market similar J2534 devices with like names. Please exercise caution when using the list above for purposes of understanding devices Mazda has validated for use. J2534 Pass-thru Device Suppliers: Mazda
 has validated the J2534 devices listed on this page. Mazda
 does not plan to validate additional J2534 devices at this time.
PCM Reprogramming Process Overview
- Purchase a subscription to PCM Reprogramming on this website.
- Download the application and install it on your PC.
- Connect the J2534 pass-thru device to the PC and the vehicle, and power it up.
- Run the application installed on your PC.
- The application will determine whether or not a new calibration file is available.
- If you choose to use the new file, the module will be reprogrammed.
- If PATS functionality is required, it can be chosen from the toolbox.
https://www.mazdaserviceinfo.com/pcm-reflashing
- J2534 Pass-Thru Programmer: TOPDON RLink J2534 is an advanced diagnostic and reprogramming tool that support all J2534 protocols, as well as D-PDU, CAN-FD and DoIP, ensuring compatibility with a wide range of modern vehicles. It offers extensive versatility with support for over 17 major automotive brands, including Chrysler, Ford, GM, Nissan, Toyota, Honda, Subaru, Land Rover/Jaguar, Volvo, Wuling, Volkswagen, Mercedes-Benz, and BMW, and so on, enjoy dealership-level functions at your fingertips
- All-in-One OEM Diagnostics: This J2534 ECU programming tool elevates your automotive repair capabilities to new heights by delivering complete OEM diagnosis. Boasting comprehensive full-system diagnostics, intuitive repair guides, advanced ECU programming and coding, common reset services, a vast library of repair information and more, this all-in-one solution empowers technicians to effortlessly tackle complex vehicle issues with ease
- Proven Performance You Can Trust: Backed by over 10000 real vehicle tests and benefit from a wealth of practical experience, this OEM reprogramming tool guarantees stable and exceptional performance. Supported by TOPDON's dedicated technical experts with in-depth knowledge of both auto repair and J2534 Pass-Thru programming, the RLink J2534 provides prompt and professional assistance, ensuring a smooth setup and reliable compatibility
- Integrated Excellence, Always Up-to-Date: Featuring the exclusive RLink Platform to provide a streamlined experience with one-click driver installation and management, ensuring flawless integration with your OE software, maintaining the original performance quality. The built-in operation guide makes mastering OE software quick and easy, so you can get started right away. Plus, with lifetime free updates, your diagnostics will stay current with the latest drivers and innovations
- Efficiency Meets Versatility: Engineered to support three CAN channels simultaneously - CAN FD and CAN-CC included, giving you the edge in fast troubleshooting. To perfectly synchronized with the OE software, please diagnose with active subscriptions and make sure your computer system is running a compatible 64-bit Windows version (7, 8, 10 or later) to fully leverage the power of RLink J2534. *We don't provide extra OE software
- 【J2534 PROTOCOL WITH SMARTLINKC】 LAUNCH X431 PRO3S+ ELITE scan tool with newly upgraded smartlinkC V2.0. The SmartLinkC is a communication interface supporting J2534 specifications. Of course, it also can be used as a J2534 PassThru device, working together with the PC installed with the OEM diagnostic software to perform the J2534 protocol.J2534 protocol is the only solution for problems ranging from driveability and loss of power to poor fuel economy.
- 【INTELLIGENT TOPOLOGY MAP TO FASTER FULL SYSTEMS DIAGNOSIS】 X431 PRO3S+ELITE bidirectional scan tool with new-added intuitive topology mapping. Harnesses intuitive topology mapping for comprehensive visualization of the vehicle all system. It shows all available control units in different colors, the numbers of system, the scanned system, and the scan results, bringing maximum convenience & superfast speed for you to do swift diagnosis & high-level repairs.
- 【TOP HARDWARE CONFIGURATION, UPGRADED OF LAUNCH X431 PRO3S+】 LAUNCH X431 PRO3S+ELITE diagnostic scanner possess with Android 10.0 OS; CPU 4-Core Processor, 2.0 GHz. Greatly increased the speed of running multiple task. 2.4GHz/5GHz; 6300mAh/7.6V stronger battery capacity; 10.1 Inch Touchscreen with 8MP camera; AUTO VIN; 4GB+64GB storage memory; 20X faster transmission rate, save more vehicle documents and customer data; Supports 25+ Software Languages, such as EN, DE, FR, SP nd JP and so on.
- 【3000+ ACTIVE TEST/BI-DIRECTIONAL CONTROL LAUNCH SCANNER】 LAUNCH X431 PRO3S+ELITE HD automotive scanner is a cost-effective bidirectional scanner that deserves owned by every repairing DIYers and mechanics. You can easily send command signal at fingertips from the scanner to various module actuators to test component integrity and functionality in minutes or even seconds to tell if replacement or repair is needed.
- 【COMPLETE 60+ HOT RESETS, CALIBRATION, INITIALIZATION, RELEARN】 LAUNCH X431 PRO3S+ELITE SmartLinkC escaner automotriz professional enjoys 60+ special service, such as Oil Reset, ABS brake bleed, EPB, SAS, BMS, Suspension, Injector reset, Power Balance, Turbo Calibration, VGT, Transmission Adaption, Throttle Adaptation, matching and etc. rigorous on-site testing has been performed to ensure 100% availability.
- 🌐【Works with Autel Elite II Elite MS908 MS908S Pro II MS908CV II MK908P MK908 Pro II】Autel J2534 work with these tools to program ECUs on specific BM.W/ BE.NZ for specific functions. ★★NOTE: J2534 CANNOT directly work with these single devices. After you received the J2534, you HAVE TO send us both the S/N(12 digits) of your scanner MS908S(etc.) and J2534. So, technically, Autel engineers can help you bind J2534 with your devices. If need any supports, contact us via: 🚘auteldirect @ outlook. com🚘.
- 🌐【SAE J2534-1 & J2534-2 Standards】Autel MaxiFlash Elite J2534 is a fully compliant SAE J2534-1 & SAE J2534-2 (March 2006) device, which performs standard PassThru J2534 functionality: Compatible with for Toyota Techstream, Volvo VIDA, Honda HDS, Jaguar-Land Rover IDS and BM.W 3G for OEM diagnostics. Autel MaxiFlash J2534 is also specially designed to provide users with P-C communication and ECU reprogramming capabilities on any modern vehicle diagnostic bus, reliability and flexibility.
- 🌐【High-speed Transmission Speed】Autel MaxiFlash Elite Reprogramming Device J2534 supports simultaneous communication definition in J2534-1, running 3 protocols at the same time, which greatly improves reprogramming and diagnostic speed. Embedded with the ARM9 Dual-core processor (clocked up to 500MHz), which further boosts the communicating speed to save more times and win more business.
- 🌐【Multiple Devices Connected with P-C】Autel MaxiFlash Elite J2534 also supports multiple device connections to the P-C, which can operate diagnostic and reprogramming functions on more than one vehicle at the same time. Autel MaxiFlash Elite J2534 built-in wireless and data storage, which can update via Internet. It also ensures quickly reprogramming even the newest controllers.
- 🌐【Extensive Compatibility】Autel MaxiFlash J2534 is compatible with Toyota Techstream, Volvo VIDA, Honda HDS, Jaguar-Land Rover IDS and BM.W 3G for OEM diagnostics. To check compatibility, please contact 🚘auteldirect @ outlook . com🚘 directly for satisfaction-guaranteed support!
- Industry-leading J2534 Pass-Thru Technology: Enabling diagnostics, reprogramming and security functions for dealerships and the independent repair facility. Economical and compact pass-thru devices provides an easy-to-use interface that allows you to repair complex vehicles with OE applications in your shop. Each type (see single branded types above) Mongoose-Plus is engineered to work with one of the following OEM's J2534 applications for Chrysler, Ford, GM, Nissan, Toyota, & VW/Audi.
- Supports Current Toyota / Lexus / Scion Vehicles: Enables diagnostics, programming and other “dealer” functions through OEM applications
- NEW Bluetooth Wireless Options Available: Providing wireless connectivity between your laptop and the Mongoose-Plus
- Expert Product Support: Staffed by technicians who understand vehicle repair and J2534 Pass‑Thru applications to help you with any technical setup questions
- Key Registration and Immobilizer Support: Using NASTF Vehicle Security Professional credentials
- ALL OF THE J2534 PROTOCOLS - This single unit has all of the protocols you need for your OEM J2534 reprogramming and diagnostics including the latest in DoIP and CanFD
- J2534 TECHNICAL SUPPORT - FREE for the life of the tool. Staffed by technicians who understand vehicle repair and J2534 Pass‑thru
- TOOLBOX WITH OEM APPLICATION DESCRIPTIONS - educational video tutorials and real-time news – Giving you the confidence and up-to-date knowledge to get the job done
- J2534 v05.00 API - The newest version of J2534 to give you the latest in pass-thru technology
- FUTURE PROOF WITH 4 CAN CHANNELS - Going beyond the 3 required by select Chrysler/FCA models, CarDAQ-Plus 3 also provides a 4th to meet the needs of future OEM applications
- CUSTOM-DESIGNED FOR USE WITH FORSCAN: Works with all FORScan compatible vehicles and is recommended by the FORScan Team
- DEALERSHIP-LEVEL DIAGNOSTICS: OBDLink EX supports all Ford protocols, modules, and advanced features of FORScan
- ELECTRONIC SWITCH allows FORScan to access all CAN buses simultaneously and enables advanced functions not possible with “toggle switch” adapters
- MAXIMUM THROUGHPUT -- up to 20 times faster than “toggle switch” adapters
- ROCK-SOLID CONNECTION avoids data corruption and dropped packets
Last update on 2025-05-08 / Affiliate links / Images from Amazon Product Advertising API
This product presentation was made with AAWP plugin.

